Showing posts with label Azure cloud. Show all posts

Saturday, March 23, 2024

Bridging Snowflake and Azure Data Stack: A Step-by-Step Guide

In today's era of hybrid data ecosystems, organizations often find themselves straddling multiple data platforms for optimal performance and functionality. If your organization utilizes both Snowflake and Microsoft data stack, you might encounter the need to seamlessly transfer data from Snowflake Data Warehouse to Azure Lakehouse. 

Fear not! This blog post will walk you through the detailed step-by-step process of achieving this data integration seamlessly.

As an example, the below Fig:1 shows a Customer table in the Snowflake Data warehouse.


Fig 1: Customer data in the Snowflake data warehouse

To get this data from Snowflake to Azure Data Lakehouse we can use cloud ETL tool like Azure Data Factory (ADF), Azure Synapse Analytics or Microsoft Fabric. For this blog post, I have used Azure Synapse Analytics to extract the data from Snowflakes. There are two main activities involved from Azure Synapse Analytics:

A. Creating Linked Service

B. Creating a data pipeline with Copy activity


Activity A: Creating Linked service

In the Azure Synapse Analytics ETL tool you need to create a Linked Service (LS), this makes sure connectivity between Snowflake and Azure Synapse Analytics.

Please find the steps to create Linked Service:

Step 1) Azure Synapse got built in connector for Snowflake, Please click new Linked service and search the connector "Snowflake" and click next as shown in Fig 2 below

Fig 2: Built in connector Snowflake

Step 2) Make sure to fill all the necessary information

Fig 3: Linked service details


a) Linked service name: Please put the name of the Linked service

b) Linked service description: Provide the description of the Linked service.

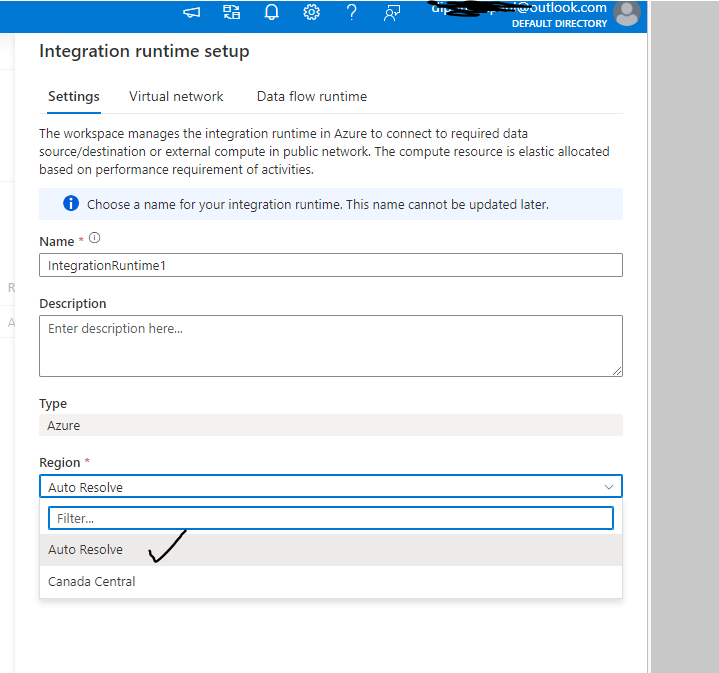
c) Integration runtime: Integration runtime is required for Linked service, Integration Runtime (IR) is the compute infrastructure used by Azure Data Factory and Azure Synapse pipelines. You will find more information under Microsoft learn page.

d) Account name: This is the full name of your Snowflake account, to find this information in Snowflake you need to go to Admin->Accounts and find out the LOCATOR as shown in figure 4.

Fig 4: Snowflake account name

If you hover over the LOCATOR information, you will find the URL as shown in fig 5.

Fig 5: Snowflake account URL

Please don't use full URL for the Account name in Linked Service, keep until https://hj46643.canada-central.azure

e) Database: Please find the database name from Snowflake, go to Databases->{choose the right Database} as shown in Fig 6

Fig 6: Snowflake Database

Snowflake database is nothing but storage. In general ,MS SQL Database, ORACLE or Teradata have their compute and storage together and called Database. However, in Snowflake; Storage is called Database and Compute is their Virtual data warehouse.


f) Warehouse: In Snowflake, you have warehouse in addition to the database. Please go to Admin->Warehouses->{choose your warehouse} as shown in fig 7. We have used the warehouse: AZUREFABRICDEMO


Fig 7: Virtual Warehouse in Snowflake


g) User name: User name of your Snowflake account

h) Password: Password of your Snowflake account

i) Role: Default role is PUBLIC, if you don't use any other role it will pick PUBLIC. I did not put any specific role so kept this field empty.

j) Test connection: Now you can test the connection before you save it. 

k) Apply: If the earlier step "Test connection" is successful, please save the Linked service by clicking apply button. 
                                                                  

B. Creating a data pipeline with Copy activity

This activity includes connecting the source Snowflake and copying the data to the destination Azure data Lakehouse. The activity includes following steps:

1. Synapse Data pipeline 

2. Source side of the Copy activity needs to connect with the Snowflake

3. Sink side of the Copy activity needs to connect with the Azure Data Lakehouse


1. Synapse Data pipeline

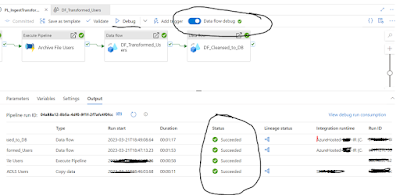
From the Azure Synapse Analytics, create a pipeline as shown Fig 8

Fig 8: Create a pipeline from Azure Synapse Analytics


And then drag and drop Copy activity from the canvas as shown in Fig 9, You will find Copy activity got source and sink side.

Fig 9: Copy Activity


2. Source side of the Copy activity needs to connect with the Snowflake

Source side of the Copy activity needs to connect with the Snowflake Linked service that we created under the Activity A: Creating Linked service. Please find how you connect Snowflake from Synapse pipeline, at first choose "Source" and then click "New" as shown in below fig 10

fig 10: Source dataset (step 1)

and next step is to choose Snowflake as shown in below fig 11


Fig 11: Source dataset with Snowflake


After choosing the above integration dataset, you will find another UI which you need to fill up as shown in fig 12

Fig 12: Source dataset details


a) Name: Provide a dataset name
b) Linked service: Please choose the Linked service which we already created under the Activity A
c) Connect via Integration runtime: Choose the very same Integration runtime you used at the Activity A.
d) Table name: Now you should able to find all the table from Snowflake, so choose the right table you want to get data from.
e) Click 'Ok' to complete the source dataset.

3. Sink side of the Copy activity needs to connect with the Azure Data Lakehouse

Now we need to connect the sink side of the copy activity, fig 13 shows how to start with sink dataset.

Fig 13: creating sink dataset

And then fill up the details to create Sink dataset as shown in the below fig 14

fig 14: Sink dataset properties


a) Name: Provide a dataset name
b) Linked service: Please choose the Linked service which we already created under the Activity A
c) Connect via Integration runtime: Choose the very same Integration runtime you used at the Activity A.
d) File Path: Now you need to choose the file path in Azure Data Storage account. I have already created a storage account, container and sub directory. The file path is: snowflake/testdata
e) Click 'Ok' to complete the source dataset.

The Synapse pipeline is completed. However, before executing the pipeline, need to check if there is any error in the code. To check it, please click 'validate'. When I did the validation found the below error as shown in fig 15


Fig 15: staging error
The error is self explanatory, since we are copying directly from Snowflake data warehouse, we must need to enable staging in the pipeline. 

To enable staging, at first click on settings of the pipeline, then enable the staging and connect a Linked service that connect a storage as shown in the below fig 16. 
Fig 16: Enable staging in the Copy pipeline


When you are connecting the blob storage for the staging please make sure it's not ADLS storage account and must need to choose Authentication type SAS URI.

After fixing the error when execute it again, the pipeline moved the data from Snowflake data warehouse to Azure data lake storge. You will find a .parquet file created as shown below fig 17

and you can view the data by using notebook as shown in fig 18. 

fig 18: Data from Azure Data Lake 


The blog post shared how you can copy data from Snowflake Data warehouse to Azure Data Lake by using Azure Synapse Analytics. The same can be achieved through Azure Data Factory (ADF) as well as Microsoft Fabric.


Sunday, April 23, 2023

How to solve Azure hosted Integration Runtime (IR) validation error in Synapse Analytics?

This blog post shares recent learning while working with Data flows in Azure Synapse Analytics.

The ETL pipeline was developed using Azure Synapse Data Flows. However, when attempting to merge the code changes made in the feature branch into the main branch of the DevOps code repository, a validation error occurred, as shown below in Figure 1:

Fig 1: Validation error

It is worth noting that the same pipeline was executed in Debug mode, and it ran successfully without encountering any errors, as depicted in Figure 2.:

Fig 2: Successfully run on debug mode


On the one hand, when trying to merge the code into the main branch from the feature branch it throws a validation error, on the other hand, the pipeline executed successfully in the debug mode. It seems a bug and reported it to the Microsoft Synapse team.

The validation error needed to be fixed so that the code can be released to the Production environment. The Azure Integration run time (IR) was used in the Data flows created by using the Canada Central region. However, IR must need to use 'Auto Resolve' as shown in Fig 3. 

Fig 3: Region as 'Auto Resolve'

And used the newly created IR in the pipeline which resolved the issue.

In summary, though your Azure resources can be created under one particular region e.g. all our resources are created under the region Canada Central, but; for Synapse Data Flows activity you need to create Azure IR by choosing Auto Resolve as the region.


Sunday, July 25, 2021

Step by step guideline to install PostgreSQL in Azure cloud and Client tool to administrate the PostgreSQL

What is PostgreSQL?

PostgreSQL, also known as Postgres, is a free and open-source relational database management system.  The official PostgreSQL site mentioned, "The World's Most Advanced Open Source Relational Database".  PostgreSQL as Open Source database gained huge popularity in past few years, this article post will focus how to install PostgreSQL in Azure cloud and tools to interact with the database.


Installation of PostgreSQL in the Azure Cloud environment

At first, login to your Azure Portal and search for PostgreSQL, You will find different services to choose from, I have chosen “Azure Database for PostgreSQL flexible servers” from the below list as shown in Fig 1. This particular service will allow to add any extension you want to add to your database in future.


Fig 1: PostgresSQL services in Azure Cloud


As soon as you choose the option you will find below figure 2, which will allow to create the postgreSQL flexible server.


    Fig 2: PostgreSQL flexible server


After clicking  "Create Azure Database for PostgreSQL flexible server" as shown in above figure 2, you will have options to choose from four different plans as shown in figure 3. As per your need you can choose from anyone of them. "Single server" was best fit for my requirements since it's enterprise ready, fully managed and I can add extension to it.


Fig 3: Choose right plan for your database

 
As soon as you hit the 'Single server' as shown above figure 3, you will find details information to fill up as shown in figure 4.

Please follow the below steps, figure (4) indicates each step listed.

1) Choose the right subscription for your resource group
2) Please select resource group where you want to install the database server, if no resource group created then you need to create a resource group. Please find details how to create azure resource group
3) Put the server name for PostgreSQL
4) Choose the location where you would like to install the PostgreSQL, I have chosen Canada Central, however; you can choose which best fit for you.
5) Choose the version of PostgreSQL that you would like deploy in Azure
6) At this step fill up the administrator account information and save this credential; you will need this when you log into the database server.

Fig 4: PostgreSQL deployment config input


After filling up the above information, please click 'Review + Create'. It will take a few minutes to complete the installation and you will find below message when deployment is completed as shown in figure 5.


Fig 5: Deployment is completed


After the deployment if you click Go to Resource (as shown bottom link at Fig 6), you will find out more details about the resource that you just created. We will need these information when database server need to connect from On-Premise IDE.

Fig 6: resource details


How to connect PostgreSQL from On-Premise GUI?


PostgreSQL deployment is completed in Azure Cloud, however; Now we need to find out how to connect this PostgreSQL database server with a Graphical User Interface (GUI) and create any new databases. One of the popular GUI for PostgreSQL is pgAdmin.

Let's start installing pgAdmin to connect the database server and do rest of the operation. Please follow the link to install pgAdmin for Windows. You can choose latest version to of pgAmin, download it and then use wizard to install it.

When pgAdmin installation is completed, you will find below (Fig 7) if you search for the app from your computer.


                             Fig 7: pgAdmin installed in my PC


Now, we are going to use pgAdmin 4 to connect the deployed PostgreSQL database server. Open the app pgAdmin 4 and right click under server as below figure 8 is shown.


Fig 8: Create connection

And then you need to fill up the details to connect PostgreSQL database server which we deployed previously (fig 4). Details are shown in below figure 9, and fill up the information as suggested below:

1. Host name/Address: This is server name which can be found under the resource details (as shown in figure 5.)
2. Port by default should be set 5432, in case it's not then please put 5432.
3. Maintenance database: It's like master database if you are coming from SQL DB experiences, it should fill up automatically, if not then put: postgres
4. User Name: It's admin user name (see figure 4 or 6)
5. Password: The password you entered (fig 4)

As well as, under General tab, please give any name you like for the connection then hit Save button.


Fig 9: connection details need to fill up


Now you are connected your PostgreSQL database server in the Azure Cloud environment from PgAdmin GUI as shown in below figure 10. Everything is set, you can create new database, add new extension to it and whatever operations you want to make. 


Fig 10: PgAdmin GUI connected with PostgreSQL in the Azure Cloud


We learned how to deploy PostgreSQL in the Azure Cloud environment as well as how we can connect the database server from on-premise GUI called PgAdmin.