Friday, December 30, 2016

How to Fix SSAS database ID and Name miss match?


You can have a situation where your SSAS database ID and Name can be miss matched. If you try to manually change the Database Name but ID still the same; this could happen when you move solution from development to Test and then change the name but still ID did not change.

What could possibly happen if the ID and Name are not same:

1) If you deploy SSAS package via Visual Studio it will look like processing but actually you will not find updated processed cube. (you can look at the last processed property of the database)
2) If you have job agent and then try to run the job it will show like it's working but actually there will be no update of the cube. You can look at the last processed property timestamp.

So, it means your SSAS package will not be updated any more.

How to check Name and ID are miss matched?

After the deployment of your SSAS Package your SSAS database look like below; where you have Tabular and OLAP cube.

Fig 1: Analysis Server Database


If you look at the tabular database closely and see the property where name and Id are miss matched.

Fig 2: Name and Id miss match for the tabular cube


What is the fix?

At first, you need to create script of the database as like below, which will generate .XMLA file:
Fig 3: Create script of the Tabular database

Generated .xmla file will look like below where you can find ID and Name.


Secondly, You need to change the ID and Name from .xmla script and press 'F5' to execute the change. Now if you look into the databse you will find the ID and Name are completely matched.

Fig 4: ID and Name is updated


Now you will be able to deploy your package with new database name but with same metadata.

Fig 5: Deploy package with new database Name

You may not be happy at this point, since you wanted to have your original name back, well, it's simple just open SQL Server Data Tools and from the solution property change your Database name as like above screenshot (Fig 5), you can put your original Database name and then deploy; you are all set now.  You may want to delete other database that you created, no worries; go ahead and delete the old one.

Monday, December 5, 2016

How to Insert data into a table with Identity column

In general, you don't insert data manually in a table which has an identity column. However, in obvious cases if you need to insert data into the table manually then writing general inset Query will failed with error:

For example, you have a table (DDL) like below:
  Create table PurchaseOrder
   (orderId int identity(1,1),
    item nvarchar(100))

If you would like to insert data into the table, standard syntax for inserting data is like below:

    Insert into PurchaseOrder(orderId,item)
     values (101,'strawberry')


However, above query will failed with below error message:

Fig 1: Eror Inserting data into the table with Identiy column

To insert the data into a table with identity column you should not put any value for the identity column. e.g. 

Insert into PurchaseOrder (orderId,item)
values ('strawberry')  

And then you will see the result set like below:


Fig 2. Output of the above insert command

However, if you would like to explicity put value for the identity column. e.g. you would like to add a negative number as orderid to make an item invalid. (sometimes you may need for the data warehouse dimension and fact tables). SQL for inserting data with your own choice:

SET IDENTITY_INSERT PurchaseOrder ON
insert into PurchaseOrder(orderId,item)
values (-1,'An Island')
SET IDENTITY_INSERT PurchaseOrder OFF


Now the result will look like below:

Fig 3: Output after  the above SQL command


Thursday, November 24, 2016

Is your Pre-Production database environment aligned with Production?

As database developer or BI developer you may get below questions many times:

1) Is our Pre-Production database has exact match with production database?
2) How do we ensure Test environment has good data quality?
3) Is our Test environment has big deviation than production system? and so on.

To answer those questions you  have different ways of investigating the database tables. However, one most obvious and first step could be counting rows of two different databse environemnts. You may think it's going to take a lot hell of time to count all the tables's row count in two different environments and list them manually.

well, you don't need to do this task manually. There is a way where you can get row counts of all the tables in a database with small piece of code. 

Please run the below code to find number of rows for each table in the chosen database.

USE AdventureWorks2012
GO 
SELECT  @@SERVERNAME AS Server_Name,
DB_NAME() AS Current_Database,
SCHEMA_NAME(A.schema_id) + '.' + A.Name as Table_Name, 
SUM(B.rows) AS Row_Count
FROM        sys.objects A
INNER JOIN sys.partitions B ON A.object_id = B.object_id

GROUP BY    A.schema_id, A.Name


I have used AdventureWorks2012 databse and result set looks like below:

Fig 1: result set of the query

At the same way you can find out  number of rows of the tables across  different database environments. Now you can place the result side by side in excel and easily compare the row numbers and number of tables between two different database environments. If you wish to make this automated then you can put this SQL code in a SSIS package and load the data after comparison.


Friday, November 4, 2016

Fix the SSIS Errror: AcquireConnection method call to the connection manager (error code 0xC0202009)

I was doing ETL to get data from staging area to Data warehouse and while runnig the data flow task it's shown the error :  The AcquireConnection method call to the connection manager [DatabseName] failed with error code 0xC0202009.

      Fig 1: Error code 0xC0202009


 Interestingly, the same SSIS package is running without error in Test and Production. After a little bit of interenet search as found, a few people mentioned about changing the Debug options from 64bit to 32Bit, It means you set Run64BitRuntime=False, as like below:

Fig 2: Change 64bitRuntime from debug options
However, it did not work for me, then tried a attribute called 'Delay validation'. You need to click the Data Flow Task's property and change the 'Delay Validation' from TRUE to FALSE.

Fig 3: Change Delay Validation Property

After changing the property you should able to run the package without error,


Saturday, October 29, 2016

Excel PowerPivot.: How to execute SQL query inside PowerPivot

Power Pivot is one of the best faeture in excel. Though PowerPivot can be used to serve different purposes, however; this post only include: how you can run your SQL code into Powerpivot and manipulte the data into the excel?

Why?


If you use Excel Power Pivot as front end tool then by implementing this process you can avoid asking developer a new excel sheet each time the data is updated.

How?
Before you start you must need to have Powerpivot enable in your excel, if so then your excel Tabs are like below:
Fig 1: Different tabs in the excel

If you don't find the tab 'POWERPIVOT' in your excel then you need to work a little more to add that. Please follow the below link to make it work: 


Step 1 :Make connection with your data source 

Fig 2: Manage option under POWERPIVOT

After you click the manage window you will find a popup window which like below, from there you will have option to connect with data source.


Fig 3. Connect with the data source


You need to follow the wizard to complete the connection. 

Step 2: PowerPivot Design

After you establish connection with the data source, then click on Design tab as like below


                         Fig 4: Design Tab from powerpivot manager

Under the design window you wil find following Tabs like picture and you need to choose 'Table properties'


Fig 5: Design- table properties


And then you need to click Table properites where you will write/paste the SQL code to generate the data directely from the data source.


Fig 6: Add SQl to the table property window

After putting the SQL code in the above window,  Please click 'validate' button before you click the 'Save' button; it will validate your SQL code. Now press 'Save' button then SQL query will run and get the data from the database and populate the data in your excel.


Tuesday, September 6, 2016

Excel connection Manager Error: Error Code 0x80004005

I was working with loading data from list of excel to the SQL database and the package was using SSIS foreach loop container, Excel source and OLEDB destination.

while I was running the package Excel connection Manager was giving the error as like below screenshot (Fig 1)


Fig 1: Error found at excel connection manager


Problem started when I have changed source from specific file to the whole folder path from the expression window:


                         Fig 2: Expression window from excel connection manager property


Error message was like below:

"Excel Connection Manager"     Description: SSIS Error Code DTS_E_OLEDBERROR.  An OLE DB error has occurred. Error code: 0x80004005.  An OLE DB record is available.  Source: "Microsoft Access Database Engine"  Hresult: 0x80004005 "


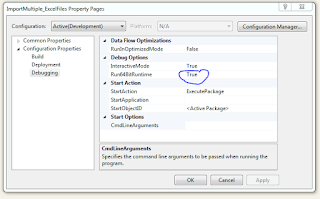
I was looking into fix the issues, after googling it I found different things can happen with the same error code: 0x80004005, however; after trying different way I found the fix which is changing the Run64BitRunTime property from TRUE to FALSE. 

How to do?


At first. right click on the Project under solution explorer and open the property window which look like below:


Fig 3: Find out the property window

Now from the property window, go to the Configuaration Properties->Debugging and then change the value for Run64BitRunTime from TRUE to FALSE and then click OK to save the changes.
                        

Fig 4. Update property value

It may still show error when you click Excel source and edit it, however if you run the package or loop container it will run and save the data to the database. 

Friday, July 29, 2016

Basic of PIVOT:Why and When to Use PIVOT function in SQL?

 One of the most powerful feature in Excel is Pivot, the folk who work with BI, heavily uses PIVOT table in Excel. However, MS SQL and Oracle has function called PIVOT that can transpose your rows into column. Though, Teradata doesn’t have the PIVOT functionality but you can achieve the by using many lines of SQL code.

Let’s start with an example, say my below table holds information about my family expenses:

Shop
Prod_Type
Price
Fotex
Grocery
560.00
Fotex
Medicine
300.00
Fotex
Electronics
2000.00
El-giganten
Electronics
5600.00
Netto
Grocery
420.00
Netto
Medicine
250.00


     Fig 1: Family expenses data

If you look at the data above you will find there are three different types of product e.g. Grocery, Electronics and Medicine.

However, I would like to see the data in different way which can give much clear view in terms of product type I regularly buy e.g.

Shop
Grocery
Electronics
Medicine
El-giganten
NULL
5600.00
NULL
Fotex
560.00
2000.00
300.00
Netto
420.00
NULL
250.00

     Fig 2: Transposed view (rows turned into column)

By looking at the above data, I can easily see different sector of my family expenses.  To get the above data view I had to transpose rows into the columns. And this can be accomplished by using PIVOT function in MS SQL.

Now, the fun part, SQL Coding:

Step1: Create a temporary table

CREATE TABLE #tempFamilyExpense
(
Shop varchar(15),
Prod_Type varchar(20),
Price decimal(10,2)
)


Step 2. Insert some dummy data

INSERT INTO #tempFamilyExpense VALUES ('Fotex','Grocery',560.00)
INSERT INTO #tempFamilyExpense VALUES ('Fotex','Medicine',300.00)
INSERT INTO #tempFamilyExpense VALUES ('Fotex','Electronics',2000.00)


INSERT INTO #tempFamilyExpense VALUES ('El-giganten','Electronics',5600.00)


INSERT INTO #tempFamilyExpense VALUES ('Netto','Grocery',420.00)
INSERT INTO #tempFamilyExpense VALUES ('Netto','Medicine',250.00)

Step 3. Look at the current data and then make the view as figure 2 by using PIVOT
/** Show original table **/
SELECT * FROM  #tempFamilyExpense

** Create transpose using PIVOT **/
SELECT *
FROM #tempFamilyExpense
PIVOT
 (
 SUM(Price)
 FOR Prod_Type
 IN (Grocery,Electronics,Medicine)
 )

 AS pv


You will find many cases where you have to make columns by using the row data (columns value) then PIVOT is your friend to help with that.

Saturday, June 18, 2016

ABC of MDX expression

If you are working with BI (Business Intelligence) and you have cube then as a developer you have tasks to produce data set for the business from the cube or cubes. Then your preferable way of populating data set will be using MDX query.

MDX is stands for Multidimensional Expressions. MDX is not specific to a database rather it's standard expressions to make query from multi-dimensional databases and solutions e.g.  MDX uses by MS SQL, Oracle, SAP, Teradata and many more vendors.

When we make SQL query it's for two dimension data e.g. rows and columns and that's how SQL is designed. In contrast, MDX can process one, two, three or more dimensions in the query.

If you have experience working with SQL, you will try to compare MDX expression with SQL syntax. While I was reading through different blogs, I found that some suggested 'Never compare with SQL Syntax that will only hurt you'. On the other hand, some wrote blog explaining how SQL syntax can be converted into MDX expression. So, right now I can't decide what to follow??!!!

So without comparing two things, I will only explain about basic of MDX expressions.
MDX expression has three different parts:

SELECT

FROM

WHERE

Part 1: SELECT

You will put both measures (fact) and dimension table's column name at the SELECT part. However, when you put columns from fact table then you need to add 'ON COLUMN' at the end of the column selection e.g. 

SELECT                                                                                  
{                                                                                                                                         
  [Measures].[Internet Order Quantity],  
  [Measures].[Internet Sales Amount]                                                 
} ON COLUMN

And when you SELECT from dimension then you need to add 'ON ROWS'
                                                                                     
            [Date].[Calendar Year].MEMBERS ON ROWS


Part 2:  FROM

As you know in SQL you generally use table or view to select FROM, however, in this case it's a cube name e.g.  FROM [Adventure Works] and a cube can hold numbers of fact and dimension tables.

So, complete syntax will look like below where SELECT and FROM part is included:

SELECT {[Measures].[Internet Sales Amount]} ON COLUMNS, 
[Date].[Calendar Year].MEMBERS ON ROWS 
FROM [Adventure Works] 


Part 3: WHERE (Optional)


The ‘WHERE’ part is not mandatory in MDX expression. This part is called slicer axis, it's similar as 'Where' clause in SQL which filters the data. And the syntax looks like: 

WHERE ([Customer].[Customer Geography].[Country].&[Denmark])  

You can filter by using completely different dimension than the one used in select statement. As like above we are filtering the data based on Customer dimension and only interested about Denmark customer to produce the result set.  Let’s make full MDX expression:

SELECT {[Measures].[Internet Sales Amount]} ON COLUMNS, 
[Date].[Calendar Year].MEMBERS ON ROWS 
FROM [Adventure Works] 
WHERE ([Customer].[Customer Geography].[Country].&[Denmark]) 


Sunday, April 24, 2016

Basic understanding of Data Warehouse(DW) and Business Intelligence(BI)

We are familiar with different key words 'Business Intelligence', 'Data Warehouse', 'ETL' and so on. These keywords are interdependent, sometimes people call one but mean other, even in the job market those three keywords are often mix, e.g. 'ETL Developer is needed' post can be filled by BI or data warehouse developer.

So, the people who are new to the area, this post will give you basic understanding of the above keywords.

The folks who work with IT, they all know about database. As we know data driven applications/solutions store valuable data in the database. Mid size to big companies use different solutions through the organizations. Due to huge volume of unstructured data as well as  more than one solutions in the organization demands separate solution that can  produces intelligence decision output.

First look at below diagram where we know how software application, desktop/web based solution are built:

Fig 1: database driven application/solution


A Data Warehouse(DW) gathers information from a wide range operational systems from a company and it's external system. To get data from different operational systems and load that into EDW require a process called ETL (Extract, Transform and Load).


Fig 2: Data Warehouse basic diagram

We get the unstructured data from different solutions in the data warehouse. Now, we can make BI solutions on top of the data warehouse. Here we split between data warehouse and BI solutions. BI solutions can be built on Data warehouse, So first make data Warehouse and then built BI solutions by using Data Warehouse. To make BI solutions and data warehouse both require ETL( Extract, Transform, Load) tools.

                         
Fig 3: BI solutions top of Data Warehouse

A Small History:


Early '80s data warehouse was the place where aggregated data was placed into special data model; user presentation of dashboards, reports, scorecards, and graphical analysis was not present at that time.

In the ‘90s BI concept came along with the presentation layers where dashboards, reports, scorecards, and graphical analysis produces clear business presentation. By looking at the data presentation business can make future decisions. Over the time it became clear that BI could not exist without data warehouse and data warehouse is the foundation for BI.

My next post will be related to Technologies around BI and a simple guideline to become BI/Data Warehouse developer/Expert.


Sunday, March 20, 2016

Git for Dummies: A basic guide to use Git for your project.

As per the Git website "Git is a free and open source distributed version control system designed to handle everything from small to very large projects with speed and efficiency." [1]

I have worked with Microsoft TFS before but this is the first time using Git for my current project. I am going to write my experiences with Git and the command set which is necessary to work with Git.

Download and Install Git:

You can download Git from https://git-scm.com/download
And then install by following the wizard. After installing Git you will see below three items those will be added as program.

Fig 1: Installed Git in the PC

Among three use 'Git Bash' to start with.

Get the source code:
To get the source code from repository, you need to clone the code. For example if the source code repository is on your network drive or any  server then you need to clone that code first at your own PC.

As you have seen from Fig 1, from three items click Git Bash and then you will find below window where you will write command:
Fig 2: Git Bash Window


If your source repository is in the network drive in your organization, e.g. network drive location is: //SourceRepository/Project1

Then, command look like below:
$ git clone //SourceRepository/Project1 myproject

The code from your network drive will be copied to myproject folder in your local PC's github folder.

If you want to change the path and then load there then the command will be:
Change path:
$ cd  /D/myproject
Then clone:
$ git clone //SourceRepository/Project1 myproject

Now the code will be in your folder /D/myproject

Then initialize it:
git init


Working with Git
Now you are ready to work on your code, you can add new file, edit and update the existing one.

Add new file:
git add paul.html

Commit file:
git commit -m 'added new page'  /*here we are putting comments while committing*/

Check status :
git status

To see list of the files in the folder:

git ls-files

Fig 3: List of the file in the Git  folder


It is good idea to make branch and then work on that branch e.g.

Make your branch:
git branch MyTestBranch

Checkout the branch:
git checkout MyTestBranch

then you can add any file to your branch or change the existing file:

Create new file:

touch test.pli

touch paul.html

Add those file:
git add .

and commit it:
git commit -m 'two new files are added'


These files are now in my branch but not saved in Master

If you checked out the master we will not find those two files:

$ git checkout master


How to merge the change from MyTestBranch to Master, you must have to be in Master Branch then write below command:
git merge MyTestBranch


 [1] https://git-scm.com/

Tuesday, February 23, 2016

Common Table Expression (CTE) in MS SQL and Teradata

Common Table Expression (CTE) is a SQL syntax that uses in MS SQL, Teradata and other databases. This post will include why will we use CTE? and SQL syntax of CTE.

By using CTE; complex query can be written as simple readable and maintainable way. It’s something like temporary result set but not exactly temporary/volatile table. You can avoid having volatile table if you use CTE. CTE is like dynamic view, however views meta data is stored in the database but CTE doesn't require that. 

A recursive CTE can simplify the code required to run a recursive query within a SELECT, INSERT, UPDATE, DELETE, or CREATE VIEW statement. For example, in an organization chart you need display employee’s positions in the organization or e.g.  Showing product hierarchies, you need to find out product segment, and then Product template, eventually the product. Above both cases, CTE can be helpful to find out the hierarchical chart.

A simple CTE query will look like below:

with CTE_PRODUCT_X_CUSTOMER (PD_ID,PROD_NAME,CUSTOMER_ID,CUSTOMER_NAME,SALES_DATE)
AS
(
Select P.PD_ID as PD_ID, P.PROD_NAME as PROD_NAME, C.Customer_ID as CUSTOMER_ID, C.CUSTOMER_NAME as CUSTOMER_NAME, S.Sales_date as SALES_DATE
From Sales as S
JOIN
From Product as P on
S.PD_ID=P.PD_ID
JOIN Customer as C
 ON S.CST_ID=P.CST_ID
 )
select * from CTE_PRODUCT_X_CUSTOMER

Above example deliver sales information of particular customer. of course, this can be done without having CTE, a simple join or view can achieve same output. However, the above example can introduce you CTE syntax.

Now, Lets look at an example where CTE can avoid volatile/temporary table. e.g. you need to update Manufacture_id from your PRODUCT_SALES table. And to update the column Manufacture_id, you are depend on Product_ID matches from other sub queries. The example can go like this:

create volatile table TMP
as
(
Select K.PD_ID as PD_ID, P.PROD_NAME as PROD_NAME, Ck.Customer_ID as customer_id, P.EFF_DT as EFF_DT

From Product_STG as P
join Product_KEY as k
on   p.PRD_CODE=k.PRD_CODE
 and p.EFF_DT> '2016-01-29'
JOIN Customer_key as CK
 on CK.SRC_ID=P.Source_Id
 and p.eff_dt>'2016-01-29'

) with data
on commit preserve rows;

 update PRODUCT_SALES
 set Manf_id=(select customer_id from TMP
              where PRODUCT_SALES.PD_ID=TMP.PD_ID
               and  PRODUCT_SALES.EFF_DT=TMP.EFF_DT)

Above example required to create volatile table. Now we can see how we can avoid using volatile table; instead, lets use CTE syntax.

with CTE_TEMP (PD_ID,PROD_NAME,customer_id,EFF_DT)
AS
(
Select K.PD_ID as PD_ID, P.PROD_NAME as PROD_NAME, Ck.Customer_ID as customer_id, P.EFF_DT as EFF_DT

From Product_STG as P
join Product_KEY as k
on   p.PRD_CODE=k.PRD_CODE
 and p.EFF_DT> '2016-01-29'
JOIN Customer_key as CK
 on CK.SRC_ID=P.Source_Id
 and p.eff_dt>'2016-01-29'
)

update PRODUCT_SALES
set Manf_id=(select customer_id from CTE_TEMP
              where PRODUCT_SALES.PD_ID=CTE_TEMP.PD_ID
               and  PRODUCT_SALES.EFF_DT=CTE_TEMP.EFF_DT) 

As you see, you can avoid creating temporary table by using CTE. Please remember, you can’t create view on top of CTE.