LEN function in MS SQL returns the number of characters of the specified string expression, excluding trailing blanks. [1]
It means if your data has trailing blank /space in the string then LEN function will ignore that.
e.g.
SELECT LEN('DK123456789 ') as LengthofString
Which give you as
length 11, though with space it’s 12.
Well, you can say we
know it will be 11 why you should have 12? Or what is problem if it returns length
as 11?
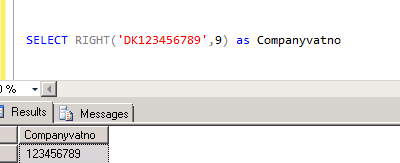
Let’s discuss the
above scenario, consider above string 'DK123456789’
is a valid company VAT registration
number. And your customer asked to get only the number part, so output should
be ‘123456789’
So you use RIGHT
function as like below:
 |
| Fig 1: RIGHT function to find number part |
And you get the right
result.
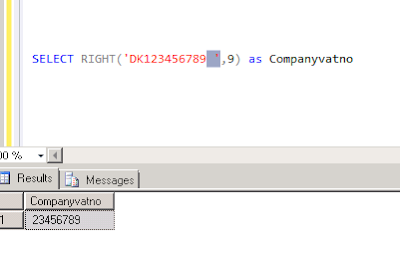
However, if your data
has issue like trailing blank then can you expect the result`? Let’s see:
 |
| Fig 2: When you have data issue |
So you lost the first
digit since RIGHT function consider space/blank as character so you get 9
character from the right side of the value which include one space but discard
first character ‘1’.
The above particular example
we already know the length, however; when we query SQL table then we don’t know
the length so we must calculate length as well.
so let’s create a table and insert some data:
CREATE Table #Table1 (
[VATRegistration] nvarchar(50))
insert into #Table1 values('DK123456789 ')
insert into #Table1 values('DE7891012879')
insert into #Table1 values('BD989741258')
select * from #Table1
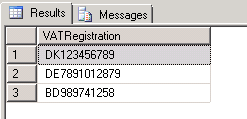 |
| Fig 3: VAT registration data |
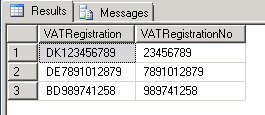
We make the SQL query to find out only number part from the above dataset,
the query is look like:
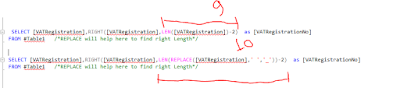
SELECT
[VATRegistration],RIGHT([VATRegistration],LEN([VATRegistration])-2) as [VATRegistrationNo]
FROM
#Table1 /*Since
we know first two characters need to exclude from the VAT number*/
 |
| Fig 4: Output with error data |
Does our result correct? Look closer and will find first row has
discarded first digit. Why this happened? Because the data has issue, If you
look at the above insert statement you will find it has trailing space. So how
do we solve this?
The main problem here is to calculate the LEN, since data LEN will not
count space as length. Well can’t we try RTRIM then? Sure let’s do it.
SELECT
[VATRegistration],RIGHT([VATRegistration],LEN(RTRIM([VATRegistration]))-2) as [VATRegistrationNo]
FROM
#Table1 /*Since
we know first two characters need to exclude from the VAT number*/
Unfortunately, result did not change, well; it’s not unfortunate; rather
this how it’s built, TRIM function will not have any effect under LEN function.
What can we do then? Yes…, REPLACE must be a good option here.
SELECT
[VATRegistration],RIGHT([VATRegistration],LEN(REPLACE([VATRegistration],' ','_'))-2) as [VATRegistrationNo]
FROM
#Table1 /*Since
we know first two characters need to exclude from the VAT number*/
Result look fine now:
 |
| Fig 5: Correct output by using REPLACE |
Since REPLACE make removed the space and put ‘_’ which is count as
character. And RIGHT function return 10 character from right to the left which
include space as well.
 |
| Fig 6: Where is the difference?? |
After you get the result you can RTRIM the final value before you present to the report or sending to the business.


