Thursday, December 16, 2021

How to integrate Azure DevOps with Azure Synapse Studio?

There are two ways you can develop and execute code in Azure Synapse Studio:

  1. Synapse live development
  2. Git enabled development.

By default, Synapse Studio uses Synapse live, as shown in Fig 1. With Synapse live you can't work in a group for the same codebase whereas by enabling Git collaboration, this becomes easy. This article will demonstrate a step-by-step guide to set up Git-enabled development in Synapse Studio.
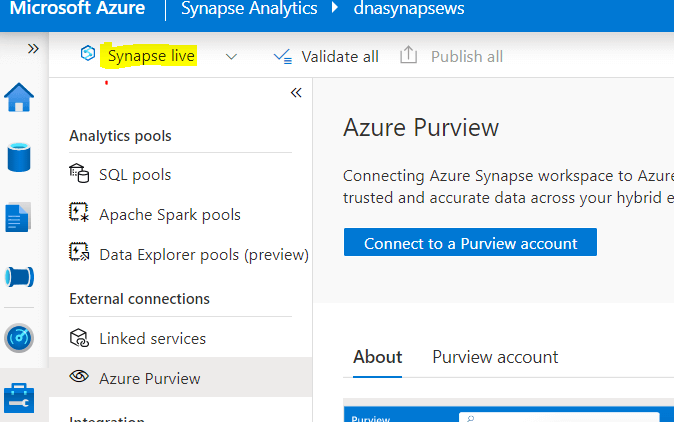
Fig 1: Synapse live

With the Git enabled development approach either you can use Azure DevOps Git or GitHub. This article will guide you using Azure DevOps Git integration.

Prerequisites

There are two prerequisites before following along with this article:

  1. Permissions - You must need to have contributor or higher role in the Synapse workspace to connect, edit or delete the source code repository.
  2. Git Repository - You also need to create the Git repository. You will find more details about creating an Azure DevOps repository in this link.

Choose from Two Different Options

There are two ways you can connect Azure DevOps Git from Synapse Studio, either from the global bar or from manage hub. You will find details below how to choose from the two options.

Option 1: The global bar

If you follow the figure 2, select the "Synapse live" drop down menu then you will find "Set up code repository". Choose this option.

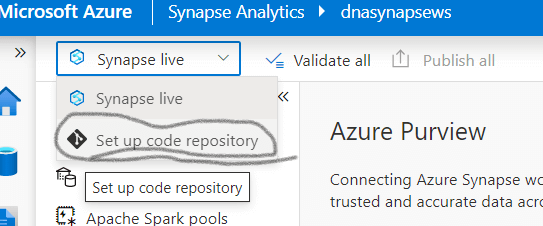
Fig 2: Setup code repo from global bar

Option 2: The Manage hub

From Synapse studio look at the left bottom menu, as shown in figure 3. Those the last icon that looks like a toolbox. This is the Manage selection. Then choose the Git configuration item int eh menu that is shown to the right of this icon. In the main pane, select configure.

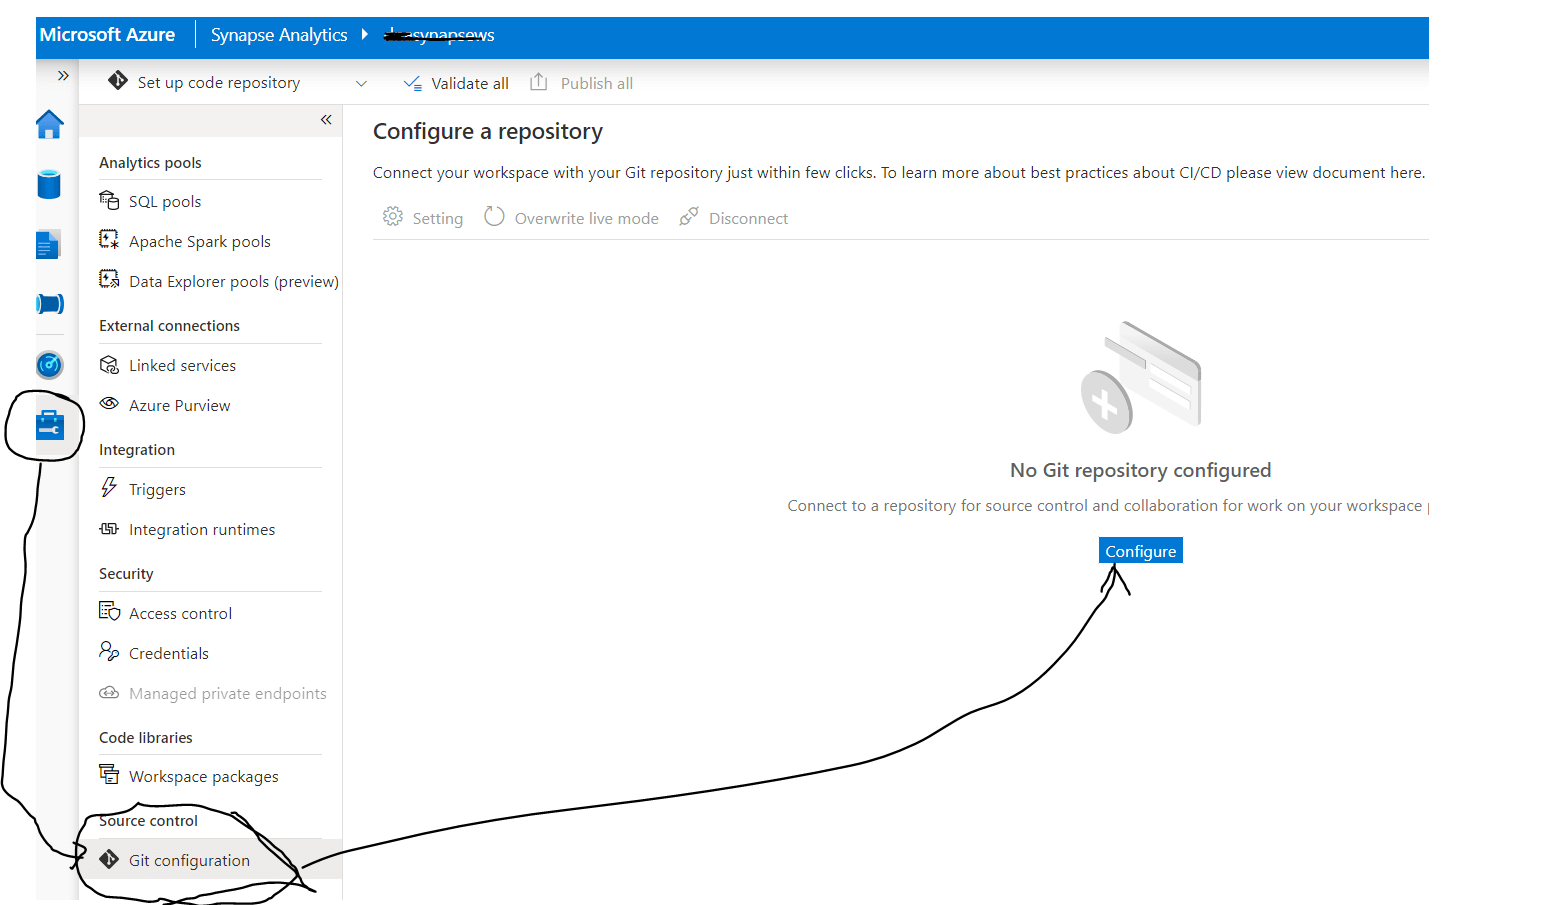
Fig 3: setup code repo from manage hub

Either of the the above two options will take you to the next step, which look like Fig 4. By selecting Azure DevOps Git you connect Azure DevOps Git with the Synapse Studio.

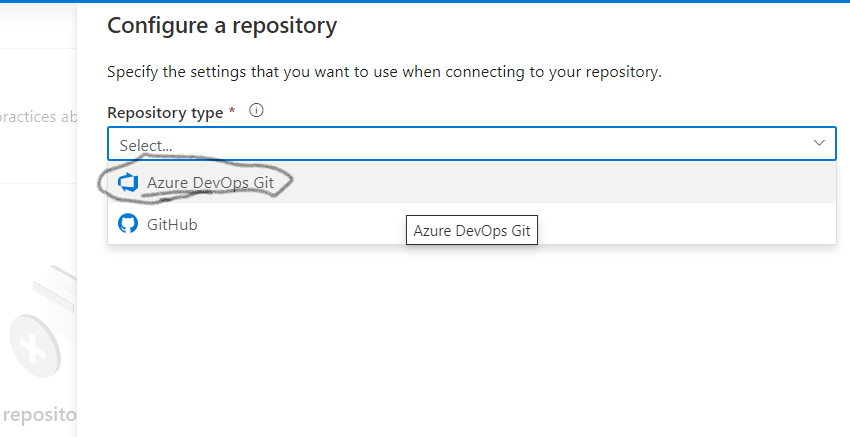
Fig 4: Choose either DevOps Git or Github

At the next step you will find one more attribute populated, as shown in the below figure 5. Please select the appropriate Azure Active Directory from your organization.

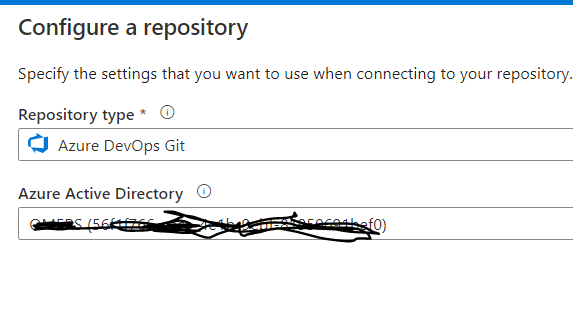
Fig 5: Connect the AD tenants

After clicking "Next" you will enter all the necessary information to choose your Git repository which is already created in your organization. Each item shown in Fig 6 is explained below:

  1. Azure DevOps Organization: In the dropdown you may find more than one organization please select the appropriate organization. It's organization name which have been created when Azure DevOps repository is configured.
  2. ProjectName: There are more than one project in the list, select the relevant one. This is Azure DevOps repos project name which you created earlier.
  3. RepositoryName: Please select the right repository from the list or you can also create a repository.
  4. Collaboration branch: By default, it's master. This is the branch where all other branch will be created from. Code will be merged to this branch from other branches as well as you will publish the code from this branch.
  5. Publish branch: The Publish branch is the branch in your repository where publishing related ARM templates are stored and updated. In general adf_publish is your publish branch but you can also make any other branch as a publish branch.
  6. Root folder: Your root folder in your Azure Repos collaboration branch.


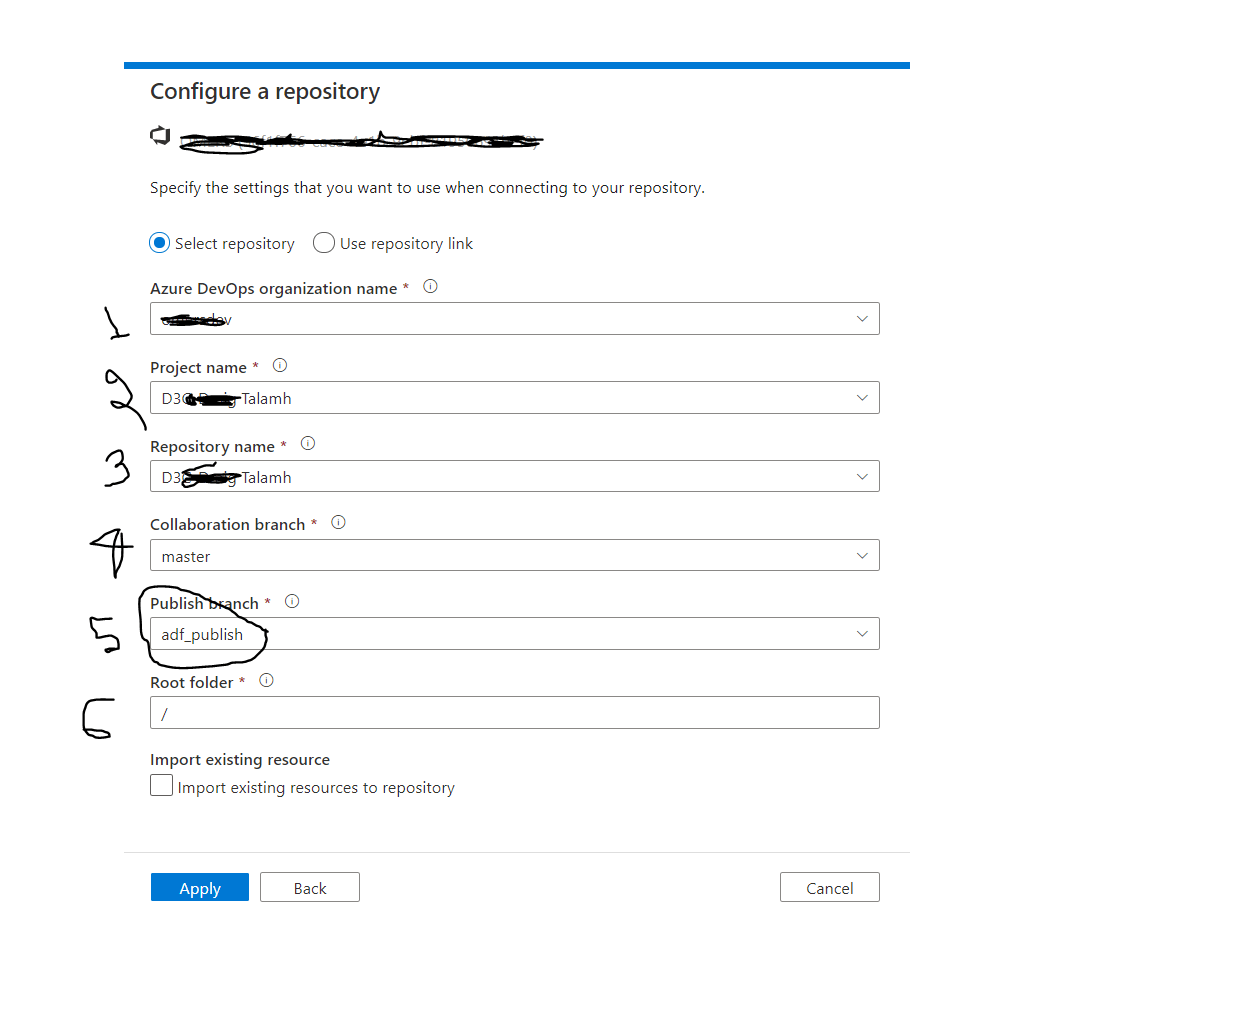
Fig 6: Configure repository

After completing all the above steps, click "Apply". When this process is successfully completed you should able to see the Git repository branches, as shown in Fig 7.

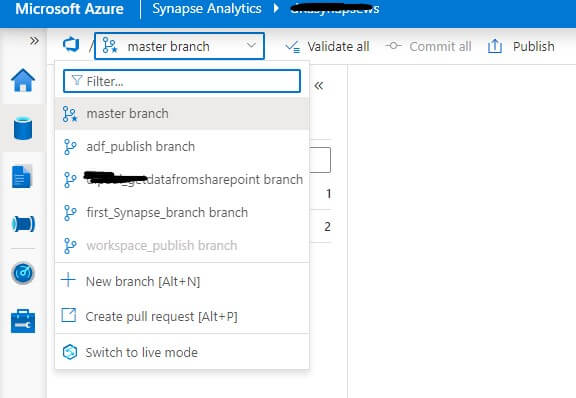
Fig 7: Synapse Studio after connecting with Azure DevOps Git

How to disconnect from Azure DevOps Git

To disconnect from Azure DevOps Git repo, you need to go to Manage-> Git configuration, as shown in Fig 8. There is a Disconnect menu item at the top.

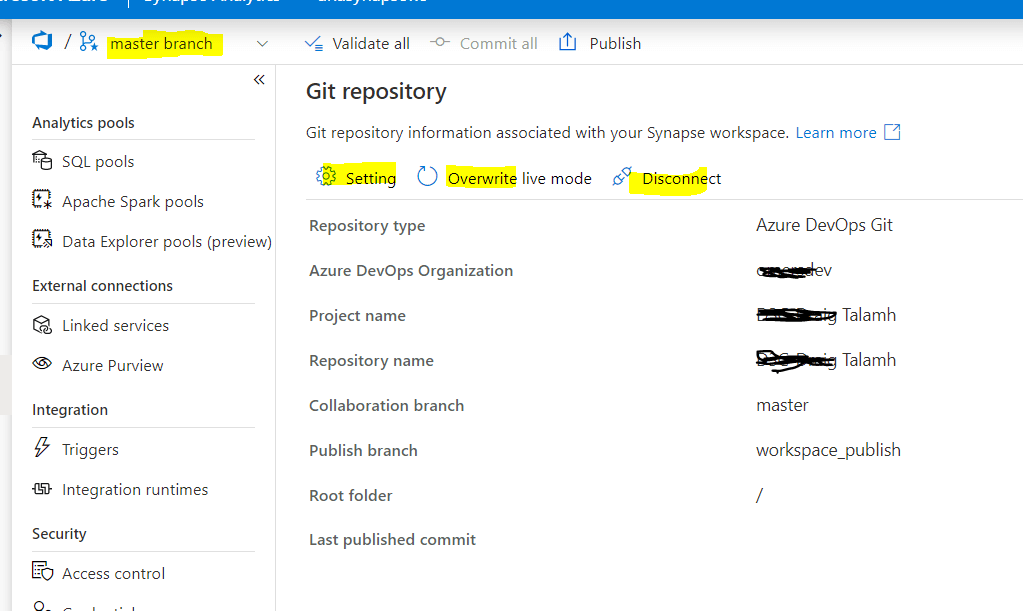
Fig 8: Disconnect from Azure DevOps Git Repo

Please note that "Disconnect" option will be disabled if you on any other branch than master. So, make sure you choose master branch if you need to disconnect the Azure DevOps Git Repo.

In summary, there are two ways to Develop and execute code in Azure Synapse and collaboration is only possible with Git enablement. The article depicted how to connect Azure DevOps Git with Azure Synapse Studio as well as how to disconnect them whenever required.

Saturday, September 25, 2021

How to recover if Azure Data Factory AutoResolveIntegrationRuntime become corrupted?

I would like to share my recent experience with Azure Data Factory (ADF) where AutoResolveIntegrationRuntime become corrupted and how to fix it. I still don't know how the Integration Runtime (IR) is corrupted and don't expect this may happen to you but if it happens then this article will help you to solve the issue.

Problem statement:

In general, the ADF AutoResolveIntegrationRuntime should look like below fig 1.


Fig 1: AutoResolveIntegrationRuntime in Azure


As shown in figure 2, I found in ADF AutoResolve IR has been changes from ‘Public’ to ‘Managed Virtual Network” and Status of the IR said "Failed to get status" under the master branch.


Fig 2: Corrupted AutoResolveIntegrationRuntime

I was shocked, was not aware of any code changes that may impact AutoResolve IR. Due to AutoResolve IR corruption release pipeline stopped working, hence we were not able to push new changes to PROD.

Identify the Issue:

After looking into the DevOps code repo, as found below fig 3 is shown extra code has been added to the original code.

Fig 3:  Managed virtual network section has been added


Resolution:

Delete the below code as shown above fig 3 from the DevOps. This part of code changed the AutoResolve IR's Sub-type from 'Public' to 'Managed Virtual Network'.

"managedVirtualNetwork": {
            "type""ManagedVirtualNetworkReference",
            "referenceName""default"
        }


After deleting the part of the code from master branch, the issue seems resolved but not completely. As shown below fig 4, the IR changes back from 'Managed Virtual Network' to 'Public', however; still the status is showing error message.

Fig 4: Status still showing error 

At this stage, release pipeline started working means I was able push the changes to  PROD. However; I wanted to see error message disappear. To clean the error message I had to delete the AutoResolve IR code as shown below fig 5. To do so, logged into the Azure DevOps and have chosen the master branch and then under integrationRuntime folder there were two files one is AutoResolve IR and other one is selfhosted IR, I have deleted AutoResolve IR file.

Fig 5: Remove AutoResolveIntegrationRuntime from DevOps

After the file is deleted, checked ADF portal and then refresh it found the error is completely gone. So anytime you find AutoResolve IR is corrupted from your master branch you know how to fix it.


Saturday, August 28, 2021

How to Flatten JSON in Azure Data Factory?

When you work with ETL and the source file is JSON, many documents may get nested attributes in the JSON file. Your requirements will often dictate that you flatten those nested attributes. There are many ways you can flatten the JSON hierarchy, however; I am going to share my experiences with Azure Data Factory (ADF) to flatten JSON.

The ETL process involved taking a JSON source file, flattening it, and storing in an Azure SQL database. The attributes in the JSON files were nested, which required flattening them. The source JSON look like this:

{

"id": "01",

"name": "Tom Hanks",

"age": 20.0,

"email": "th@hollywood.com",

"Cars":

  {

  "make": "Bentley",

  "year": 1973.0,

  "color": "White"

  }

}

The above JSON document has a nested attribute, Cars. We would like to flatten these values that produce a final outcome look like below:

{

"id": "01",

"name": "Tom Hanks",

"age": 20.0,

"email": "th@hollywood.com",

"Cars_make":  "Bentley",

"Cars_year":  "1973.0",

"Cars_color":   "White"

}

How do we do it by using ADF?

Let's create a pipeline that includes the Copy activity, which has the capabilities to flatten the JSON attributes. Let's do that step by step.

First, create a new ADF Pipeline and add a copy activity.

Fig 1: Copy Activity in ADF


Next, we need datasets. You need to have both source and target datasets to move data from one place to another. In this case source is Azure Data Lake Storage (Gen 2). The target is Azure SQL database. The below figure shows the source dataset. We are using a JSON file in Azure Data Lake.

Fig 2: Source dataset

We will insert data into the target after flattening the JSON. the below figure shows the sink dataset, which is an Azure SQL Database.

Fig 3: Sink dataset

Please note that, you will need Linked services to create both the datasets, this article will not go into details about Linked Services, to know details you can look into the Microsoft document.


3. Flattening JSON

After you create source and target dataset, you need to click on mapping as shown below figure 4 and follow the steps:

Fig 4: Flattening JSON

a) At first import schemas
b) Make sure to choose value from Collection Reference
c) Toggle the Advanced Editor
d) Update the columns those you want to flatten

After you have done above, then save it and execute the pipeline. You will find flatten records are inserted to the database as shown in fig 5.


Fig 5: Saved data into the table after flattening


Be cautious

Make sure to choose "Collection Reference" as mentioned 3.b, if you forget to choose that then the mapping will look like below Fig 6:

Fig 6: Without putting collection reference


If you look at the mapping closely from the above figure 6, the nested item in the JSON from source side is: 'result'][0]['Cars']['make'] which means it will only take very first record from the JSON. If you execute the pipeline you will find only one record from JSON file is inserted to the database. So it's important to choose Collection Reference.

In summary, I found Copy Activity in Azure Data Factory make easier to flatten the JSON, you don't need to write any custom code which is super cool.


Sunday, July 25, 2021

Step by step guideline to install PostgreSQL in Azure cloud and Client tool to administrate the PostgreSQL

What is PostgreSQL?

PostgreSQL, also known as Postgres, is a free and open-source relational database management system.  The official PostgreSQL site mentioned, "The World's Most Advanced Open Source Relational Database".  PostgreSQL as Open Source database gained huge popularity in past few years, this article post will focus how to install PostgreSQL in Azure cloud and tools to interact with the database.


Installation of PostgreSQL in the Azure Cloud environment

At first, login to your Azure Portal and search for PostgreSQL, You will find different services to choose from, I have chosen “Azure Database for PostgreSQL flexible servers” from the below list as shown in Fig 1. This particular service will allow to add any extension you want to add to your database in future.


Fig 1: PostgresSQL services in Azure Cloud


As soon as you choose the option you will find below figure 2, which will allow to create the postgreSQL flexible server.


    Fig 2: PostgreSQL flexible server


After clicking  "Create Azure Database for PostgreSQL flexible server" as shown in above figure 2, you will have options to choose from four different plans as shown in figure 3. As per your need you can choose from anyone of them. "Single server" was best fit for my requirements since it's enterprise ready, fully managed and I can add extension to it.


Fig 3: Choose right plan for your database

 
As soon as you hit the 'Single server' as shown above figure 3, you will find details information to fill up as shown in figure 4.

Please follow the below steps, figure (4) indicates each step listed.

1) Choose the right subscription for your resource group
2) Please select resource group where you want to install the database server, if no resource group created then you need to create a resource group. Please find details how to create azure resource group
3) Put the server name for PostgreSQL
4) Choose the location where you would like to install the PostgreSQL, I have chosen Canada Central, however; you can choose which best fit for you.
5) Choose the version of PostgreSQL that you would like deploy in Azure
6) At this step fill up the administrator account information and save this credential; you will need this when you log into the database server.

Fig 4: PostgreSQL deployment config input


After filling up the above information, please click 'Review + Create'. It will take a few minutes to complete the installation and you will find below message when deployment is completed as shown in figure 5.


Fig 5: Deployment is completed


After the deployment if you click Go to Resource (as shown bottom link at Fig 6), you will find out more details about the resource that you just created. We will need these information when database server need to connect from On-Premise IDE.

Fig 6: resource details


How to connect PostgreSQL from On-Premise GUI?


PostgreSQL deployment is completed in Azure Cloud, however; Now we need to find out how to connect this PostgreSQL database server with a Graphical User Interface (GUI) and create any new databases. One of the popular GUI for PostgreSQL is pgAdmin.

Let's start installing pgAdmin to connect the database server and do rest of the operation. Please follow the link to install pgAdmin for Windows. You can choose latest version to of pgAmin, download it and then use wizard to install it.

When pgAdmin installation is completed, you will find below (Fig 7) if you search for the app from your computer.


                             Fig 7: pgAdmin installed in my PC


Now, we are going to use pgAdmin 4 to connect the deployed PostgreSQL database server. Open the app pgAdmin 4 and right click under server as below figure 8 is shown.


Fig 8: Create connection

And then you need to fill up the details to connect PostgreSQL database server which we deployed previously (fig 4). Details are shown in below figure 9, and fill up the information as suggested below:

1. Host name/Address: This is server name which can be found under the resource details (as shown in figure 5.)
2. Port by default should be set 5432, in case it's not then please put 5432.
3. Maintenance database: It's like master database if you are coming from SQL DB experiences, it should fill up automatically, if not then put: postgres
4. User Name: It's admin user name (see figure 4 or 6)
5. Password: The password you entered (fig 4)

As well as, under General tab, please give any name you like for the connection then hit Save button.


Fig 9: connection details need to fill up


Now you are connected your PostgreSQL database server in the Azure Cloud environment from PgAdmin GUI as shown in below figure 10. Everything is set, you can create new database, add new extension to it and whatever operations you want to make. 


Fig 10: PgAdmin GUI connected with PostgreSQL in the Azure Cloud


We learned how to deploy PostgreSQL in the Azure Cloud environment as well as how we can connect the database server from on-premise GUI called PgAdmin.

Sunday, June 6, 2021

Why Power query as a transformation activity in Azure Data factory and SSIS?

This blog post will describe how power Query activity in ADF and SSIS can be useful. As well as, I will share the differences of Power Query activity between SSIS and ADF.

Why Power Query and When to use it?

When data engineer works for transformation pipeline they get different activities like lookup, merge, data conversion etc. in their preferred ETL tool. ETL tools like Azure data factory (ADF) got Dataflow and Databricks to solve complex transformation. In addition, ADF introduced 'Power Query' (previous name data wrangling) as an activity. Please note that, Power query is still in preview for both Azure Data Factory (ADF) and SSIS. 


Fig 1: Power Query in ADF

Despite having many activities in Azure data factory why we need Power Query? Let's share my experience when Power Query have chosen as an activity in the pipeline.  The task was to get data from complex excel files with many calculation and more than 1000 columns which is used by business as an application. Yes! you got it right, it's an excel application, organization still uses excel as an application!!  A few transformed and calculated columns need to go to the modern data warehouse from the excel files. 

In this scenario, thought about what would be the best activity to choose from: DataFlow, Databricks or Power Query? well, I would say all of them may work but Power Query was the best choice.

Let me explain, why? Since the source file is excel and it's got  more than 1000 columns with many calculation inside, It's almost impossible for a Data Engineer to find out how to derive the expected outcome where no mapping or transformation logic is provided. By using Power Query visual transformation, business expert and I were able to work closely and produce the output in a very short period of time. 


Fig 2: Power Query transformation in ADF

 As a Data Engineer, when you work with dataflow or Databricks or any other transformation activity in ETL tool, you follow the documented mapping logic and build the pipeline. It means transformation rules and mappings are predefined. However, when transformation rules are yet to discover then best to start with Power Query. You can simply start with Power BI desktop to work together with business to produce the expected outcome. And when output is verified and accepted then then copy the M Query to ADF Power Query activity or SSIS Power Query source. In fact, now you have the transformation rules in the M Query so if you like to use other transformation activity like dataflow or Databricks you can use that too.


What works in SSIS but not in ADF?

Power Query activity is in Preview for both SSIS and ADF, however; if you choose ADF then you need to convert the source file from .excel to .csv since Power Query for ADF doesn't support .excel as source dataset.


Fig 3: Source dataset for Power Query

However, if you work with Power Query in SSIS then it support excel as source. On Contrary, in SSIS; when you are working with Power Query Source, it doesn't have user interface to make the transformation like ADF. The obvious reason is, you can use Power BI desktop to do the transformation and then copy the M query (Power Query generate M syntax which called M Query) from Power BI and paste it to Power Query Source in SSIS.

Fig 4: Power Query in SSIS


In summary, Power Query in both SSIS and ADF is useful Activity and new feature which still in preview, hence there might be many different scenarios where you want to use Power Query activity, however; this article is based on my experiences with Power Query activity in ADF and SSIS. It's also interesting to know that, The user interface you get under ADF Power Query is identical to Power BI, however, not all M query is supported by ADF Power Query yet.


Sunday, April 25, 2021

Handling SQL DB row-level errors in ADF (Azure data factory) Data Flows

If you are working with ADF (Azure data factory) data flows then you may have noticed there is a new feature released in Nov 2020 which is useful to capture any error while inserting/updating the records to the SQL database.

Fig 1: Error row handling at sink database

For error handling there are two options to choose from:

1) Stop on first error (default)

2) Continue on error


                                                    Fig 2: Error row handling options

By default, ADF pipeline will stop at the error. However, the main purpose of this feature to use option "Continue on error" to catch and log the error so that we can look at later and take action accordingly. 

Let's fill up the settings to catch errors rows, below figures show the settings and will also describe each setup (Please follow the numbering in the figure 3).

1) Error row handling: Since we wanted to catch the error so we have chosen "Continue of error" at Error row handling.

Fig 3: Settings Continue on error

2) Transaction Commit: Choose whether the data flow will be written in a single transaction or in batches, I have chosen single, it means whenever there is failure it will store the record on the other hand batch will store error records when full batch is completed.

3)Output rejected data: You need to make this check mark TRUE to store the error rows. The whole point of error row handling is you want to know the error records; if so, please tick check mark. Though you can avoid this, in that case pipeline will run but if there is any error you will not know which records causes the error.

4) Linked Service: Put the linked service and test the connection

5)Storage folder path: Storage path need to mention here, it's the path where you would like to store the error records in a file.

6)Report success on error: I don't put report on success checkbox to TRUE since I wanted to know if there is a failure.


After the settings, when you run the pipeline and if there is any error in the dataset, it will be stored in your storage folder as you have provided at point no 5 in the settings.


In general, when there is a failure at the time of inserting records to the database it takes sometime to find out the reason of failure. You may have to go through large chunk of dataset and look for miss match of data types or NULL value etc. to find out the root cause. Through this feature the error records will be captured and stored in the storage so you will be able to identify the reason for any error very quickly. And if you would like to ingest those error rows then you can fix those records and re-run the pipeline.

Sunday, March 28, 2021

Step by step guideline to install Jupyter Notebook

Whether you work as a Data Engineer or a Data Scientist, a Jupyter Notebook is a helpful tool. One of the projects I was working required a comparison of two parquet files. This is mainly a schema comparison, not a data comparison. Though the two .parquet were created from two different sources, the outcome should be completely alike, schema wise. At the beginning I was manually comparing them then I thought there must be a tool to do that. Well, that's how I found a Jupyter notebook can be useful to compare two .parquet files' schema.

The Jupyter Notebook can be used for data cleaning and transformation, data visualization, machine learning, statistical modeling and much more. This post will describe the step by step installation process of Jupyter notebook.

Step 1: Install python version 3.7.9

Python is a prerequisite for running a Jupyter notebook, so we need to install python first. Please follow this URL and choose right version to install: https://www.python.org/downloads/.

I have chosen 'Windows x86-64 executable installer' for my Windows 64 bit OS. Please choose the version as per your computer Operating system.

Fig 1: Windows Executable

You can download the executable file and save in any location at your computer.

Now next step is to create a 'Python' folder under the C: drive, we will use this folder as installation location at later step.

Fig 2: Python folder under C


Find out the downloaded executable file, I have saved the executable file under Downloads folder (shown in below figure 3). Now double click the executable file to initiate the installation process.

Fig 3: Python Execution file

Make sure to choose 'Customize Installation' and check mark 'Add Python 3.9 to PATH' as shown in figure 4. I followed the customization method to avoid setting up environment variable.

Fig 4: Python Installation wizard

As below figure 5 shown, the Customize installation location, where make sure you put the installation location folder C:\Python\Python39. We have created 'Python' folder in C drive in earlier step (Fig 2)

Fig 5: choose the location

Now hit the Install button. Installation will complete in a minute or two.

Let's test if python installed successfully, open command prompt and type "python". If python is installed correctly then you should able to see the python version number and some key help, as shown below in Fig 6.

Fig 6: Python installed successfully.

Step 2: Install the Jupyter Notebook

Let's move to the next step, which is to install the Jupyter notebook software. Open command prompt and type the below code:

>pip install jupyter
 
Fig 7: Jupyter Notebook installation started

When installation is complete, let's run the Jupyter Notebook web application. To do this, you need to go to a cmd prompt and execute this command, as shown in below figure 8:

Jupyter notebook
 
Fig 8: Opening Jupyter Notebook
 
As soon as you hit the above command button, It will open a browser with jupyter notebook as shown in figure 9.
 
Fig 9: Jupyter Notebook on browser

Now you can create a Notebook by choosing 'New' and choose Python 3 as show in fig 10. This will open a new browser tab where you will write the code.

Fig 10: Open Notebook

Let's write hello world program in the Jupyter notebook. The browser will look like figure 11 if you enter this code:

print('Hello world')

The output is shown after clicking the 'Run' button.

 
Fig 11: Hello world in Jupyter Notebook

Now you can write and run other notebooks.

In this article, we learned how to install python and Jupyter Notebooks and have also written a simple hello world program. There are different ways you can install Jupyter Notebook, but I followed this approach and found simple.

Tuesday, February 23, 2021

How to add local timestamp end of the files in ADF?

This article will describe how to add your local timestamp at the end of the each file in Azure Data Factory (ADF). In general, ADF gets a UTC timestamp, so we need to convert the timestamp from UTC to EST, since our local time zone is EST.

For example, if the input Source file name in SFTP is "_source_Customer.csv", then the expected outcome will be, "_source_Customer_2021-02-12T133751.csv". This means that the pipeline should add '_2021-02-12T133751' to the end of each file. This will work dynamically, which means that any file you pass from the source will have the timestamp added to it by using an ADF regular expression.

Let's set a simple pipeline and explain the scenario in a few steps. In this example, we receive files from an event based trigger and hold the file name in a parameter. The main part of this article is how to append the current date and time to the end of the file name we received. Please note that event based triggers will not be discussed here. If you like to know more about how to create trigger, please follow this link.

Step 1: Add Copy Activity

Create a simple pipeline with at least one Copy activity that connects a source and a sink, similar to what is shown in Fig 1.


                                          Fig 1: Pipeline with Copy Activity
 

Step 2: Adding a parameter to receive the file name 

Before adding the expression, we need to have a parameter in the pipeline that will catch the filename from a trigger. For the time being assume that the trigger will give us the file name and the parameter is to hold the filename.
 
                                                 
                                                              Fig 2: Adding parameter

Step 3: Prepare the sink dataset

In the Copy data activity there is a Sink dataset that needs a parameter. Click on the Sink dataset and when it opens, you will find the view similar to Fig 3.

                                                                         
                                                                                Fig 3: Adding parameter to the dataset
 
To add parameter to the dataset, click New and add the parameter name. Select the type, which should be a string. Now you you will see the sink dataset looks like Fig 4. The value edit box is where you need to add the dynamic content.
                                             
                                                  Fig 4: Dynamic content to add the timestamp


Step 4: Setting up a dynamic expression

Now, let's create the dynamic expression. As soon you hit the 'Add dynamic content', shown in Figure 5, you will able to write the expression that will convert the UTC timestamp to EST and then pad end of the file.

                                         
                                                                  Fig 5: expression language
 
We apply a number of functions to the pTriggerFile parameter from Step 1. Let's have closer look at the expression:
@concat(replace(pipeline().parameters.pTriggerFile,'.csv',''), '_', 
formatDateTime(convertTimeZone(utcnow(),'UTC','Eastern Standard Time'),'yyyy-MM-ddTHHmmss'), '.csv')

Find out the explanation of the above expression.

  1. First we need to get the filename from the parameter, pTriggerFile. The value here will be: _source_Customer.csv
  2. Next we use REPLACE() to replace the .csv with empty string : replace(pipeline().parameters.pTriggerFile,'.csv',''). This case, we get:  _source_Customer
  3. We need to get the timestamp. To do that, we convert utcnow() to EST with this function: convertTimeZone(utcnow(),'UTC','Eastern Standard Time')
  4. We want to format the date, and use this: formatDateTime(convertTimeZone(utcnow(),'UTC','Eastern Standard Time'),'yyyy-MM-ddTHHmmss'), which will return a value like: 2021-02-12T133751
  5. We put this all together with @concat(Step1,'_', 'Step4','.csv'), which will return _source_Customer_2021-02-12T133751.csv

We learned how to add local timestamp end of any file, though in this case, the source file was a .csv. However, you can follow the same process for .txt file where you only need to change '.csv' to '.txt' in the expression.