Wednesday, November 7, 2018

SQL: Pay attention when using Group by and CASE WHEN statement together

When you are working with SQL and having case when statement together with 
group by then please have a close look at the what are you putting in the case
when statement. 

For example, Cases like below is pretty much straight forward:
 
Select cust_key,
       Cust_site_key,
       Max(rating_key) as rating_key
From Customer_rating
Where year=2018
Group by 1,2
 
However, Now let's look at the below code and see if you find any issue with
this code.

Select
event_key,
Event_code,
CASE Event_code
   When ‘start’ then min(f.event_date_key)
   When ‘Closed’ then max(f.event_date_key)
ELSE
   f.event_date_key
END as c 
FROM
Event_fact f
Join
event_dim ed
On
f.event_key=ed.event_key
Group
by event_key,Event_code


After running above code you will get error with "Failed
3504: Selected non-aggregate values must be part of the associated group."

What can go wrong? Well, you may think; event_date_key is using aggregate
function (min and max) so you don't need to use group by with 
event_date_key. However, if you look closely then will find ELSE part of the CASE
statement also using the event_date_key where no aggregation applied. It means 
we need to use group by with event_date_key.

Hence the correct code will be:
Select
event_key,
Event_code,
CASE Event_code
   When ‘start’ then min(f.event_date_key)
   When ‘Closed’ then max(f.event_date_key)
ELSE
   f.event_date_key
END as c 
FROM
Event_fact f
Join
event_dim ed
On
f.event_key=ed.event_key
Group
by event_key,Event_code,event_date_key

Sunday, October 14, 2018

SSAS cube: Partition process successfully but measure group is not showing any data

Some days will bring you big surprise which you are not prepare for at all!! I am going to share one of them!!

One of the cube I was working with processed successfully but there is no data in the measures which was just there before last processed.

What can go wrong??

I have only  added one attribute to the existing dimension. And then processed default, processed full, processed partition by by partition full; all different cases processed successfully but no data under the measure group. When I drag dimensions under SSAS cube browser I am able to see the value but no rows are show while adding measures.

Was google helpful?

Through google search, some suggested to check if the source database connection is set correctly, Some talked about full process, some mentioned about adding slice to process the partition correct.

Nothing really helped me.

What steps resolved the issue?

step 1: Make sure you have right database connection and passed your credential as well as used correct impersonate  correct(sometime cube don't show you the correct error message)

step 2: Process all the dimensions one after another

step 3: Since it's huge data set so process one partition and checked the estimated size property of the specific partition that you just processed.

If estimated size of the partition property is not 0 MB, it means you should have the data.

Lesson learned: if you find the cube measure is not shown any data suddenly after adding an attribute to the existing dimension then do process all the dimensions (not only the changed dimension) and then process the cube. This step is always helpful if your cube behave strange sometime without noticing you :)


Saturday, September 22, 2018

How to resolve if connection string changes throw error in your excel report?

Scenario: For example, an excel report is connected to SSAS cube in Production and it's serving business needs. However; for some reason SSAS server has been changed, hence the connection need to point to the new server. How will you change the connection with new SSAS server? 

Well, you may thinking it should be pretty straight forward, just change the connection string where SSAS server name should be replaced(as like fig 1)  then refresh all and it should be ready to use again. 

Fig 1: Changing data source from Connection string


Unfortunately it will not work for some cases or many cases. I actually did the same but ended up with error like below:

Fig 2: Error after changing connection.


Okay!! got it, then how to solve this? 

Solution: Please find the solution below:

Go to 'Analyse' tab in your excel as like Fig 3. 


Fig 3: Find Analyse tab

And then change the connection by using change data source (Fig 4):

Fig 4: Change data source

After your change the data source, hit the 'Refresh All' button , it should work now without any error.

Sunday, July 15, 2018

SSAS Calculations: How to deploy calculation changes quickly in a cube?

If your SSAS solution is multidimensional then you may have at least a few calculated measures in your cube. And every time you change MDX script under calculation you need to process the cube; though only default process will effect the changes in the cube but still you may spend sometime for processing the cube.

If the cube is bigger  and have many partitions then you may easily spend good amount of time for processing the cube every time; even though you modify a very little part of MDX script.

To avoid processing the cube every time you change MDX script, you can use BIDS helper which will save development time. Though BIDS helper can help many ways in MS BI development, however; this writing only include MDX deployment part of SSAS multidimensional cube.

BIDS helper is an extension to Visual studio, So first step will be to download the extension, you will find  Extension and Update under Tools in Visual studio as like below figure 1

Fig 1: Find Extension and update


Then you can search BIDS helper and install it as like figure 2:

Fig 2: Search and install BIDS extension


After you complete the installation, please restart visual studio. And as long as you open your multidimensional cube you will find new icons under the calculation tab. The new icon look like below figure 3:

Fig 3: New BIDS helper icon


If you mouse over the icon it will display ''Deply MDX Script", as long as you click the icon it will deploy the MDX script to the cube immediately. So you don't need to process the cube at all.


Friday, June 15, 2018

MS Analysis Services:How to sync SSAS Cube?

When business users accessing a SSAS cube by connecting via excel or any other front end tool and at the same time if you process the cube then user can be affected badly. User simply can't access the cube if you are processing the same.

To avoid the above scenario, we can have two different SSAS server, one for Processing and other for Query. Business user should connect the Query server. So while you processing the cube it will update the Processing server; so user  can't be affected while you are processing the cube since user will be connected with Query server.

Today's writing will cover how to sync cube from one server to other.

Step 1: Find the Query server where you want to sync.

Click at the database of the server and then click Synchronize as like below fig 1

Server->Database->Synchronize

Fig 1: Sync to the Query server


Step 2: Synchronize wizard

At this step it explains what do you with the wizard


Fig 2: synchronize wizard

Step 3:  Choose the server from where you would like to sync which can be your processing server and Destination server will be automatically chosen.


Fig 3: Choose source and Destination to Sync

Step 4: Specify location for the partition, you can leave as default

Fig 4: location for partition

Step 5: Choose security roles and members

You need to take this part as per your need, if you don't want to copy any role and security from the processing server then you can choose third option 'Ignore all'. And if you want role need to copied but not members then choose 2nd option.

Fig 5: Choose what to Copy from processing Server


Step 6: Save script or Synchronize

At this last step, you can either start synchronize or generate the script to save in a file for later uses.
Fig 6: Last step of synchronization

You may choose Synchronize now, however; you can copy the script so that you can add the script to a SQL Server Agent job. 

Why do you create SQL Server Agent job?

If you need to sync the cube from Processing server to Query server time to time then creating job will be the best solution. Hence, the script saved from step 6 can be used to create a job. And whenever you need to sync the cubes you can run the job.


Sunday, April 29, 2018

Power BI: Error 'Unable to connect' while connecting to SQL database which was working earlier.

Think about a sceniro where you developed a power BI solution and published it. However, all of a sudden your data is not refreshed and you are not able publish with updated data. As long as you click 'refresh' from Power BI desktop it gives error saying as like below fig 1.

Fig 1: Unable to Connect error message

You don't have any clue what has happened since you did not change anything. OK!! Though you did not change anything in your .pbix file, however;  Microsoft changed something in January 2018 version. yes, they have updated the credential type at that version. So before Jan 2018 version of power BI had three options like below:
Fig 2: Credential Type before Jan 2018 version


The credential type after the version Jan 2018 look like fig 3:

Fig 3: Credential after Jan 2018

So if your solution was developed before Jan 2018 and you may likely face this situation.

What we do to fix it?

There are three steps process to resolve the issue as follows:

Step 1: Find data source settings
Open the .pbix by using power BI desktop and then find data source settings, which you will find as like fig 4.

Fig 4: Go to settings of data source

Step 2: Edit permissions
When you click data source setting you will find Edit permissions window will look like fig 5.

Fig 5: Edit permission


Step 3: Change the credential type

If you look at the below fig 6, the credential type has changed from 'organizational account' to 'Microsoft account',  if your .pbix is built before jan 2018 version of Power BI then you need to change the option from 'organizational account' to 'Windows' and then it's should work as it used to.

Fig 6: Credential Type


Sunday, March 18, 2018

How to repeat column header in each page of a SSRS Report?

When your SSRS report produce more than one page of output then at the second page and onward you are missing the column headers. So you miss the mapping between data and corresponding column header. You may feel lost, but; how to survive from this situation? Must need to add column header in each page.

To achieve above you need to change some properties of the report. If you go to Tablix properties then you will find options to choose which work fine with matrix but unfortunately doesn't work with table.

Fig 1: Tablix property
Since in my report, I have used Table (fig 2), so when I have used the above properties from Tablix it did not work.

Fig 2: SSRS toolbox 'Table'
To make it work, I had to choose advance properties which are followings:

1) Make advance property available 

Select heading section and then select the arrow at the right corner to get advance option available (fig 3)
Fig 3: Finding advance property 
2) Update the advance property value 

After you click the 'advanced mode' described in step 1, you will find below:

Fig 4: Looking into Advance mode


Make sure you have selected 'static' (yellow shaded from fig 4) and then find the properties of it by clicking property window from View->Properties window which will look like figure 5.
Please change the value KeepWithGroup='After' and RepeatOnNewPage='True'.


Fig 5: update the property value


Wednesday, February 14, 2018

How to load data into Data Warehouse from a RESTful API

While you are working with data warehouse/ BI development, sometimes you may need to load data from API. The API can be RESTful or SOAP web service. However, this post cover how to load data from RESTful API which return a .JSON file and then insert the data from the .JSON file into a table in Data Warehouse.

Tool uses: Visual Studio 2017 Windows Application (C#), SSIS, MS SQL Server 2016 +

Steps includes:
1) Load data from Web API (REST) and save as .json file by using  Visual Studio 2017 Windows Application (C#)
2) Insert data from the .json file to a table in data warehouse by using MS SSIS


Details of the steps are followings:


Step 1: Load data from Web API (REST) and save as .json file by using  Visual Studio 2017 Windows Application (C#)

a) Create a visual studio solution by selecting Windows Form Apps under Windows Classic Desktop as like below figure 1.

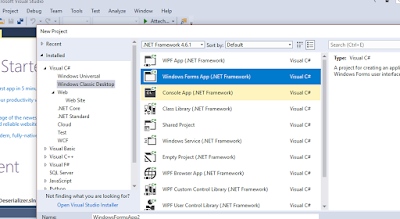
Fig 1: Create VS solution to load data from Web API
b)  Code Behind to call web service and generate the .JSON file

Please copy the code and paste into your newly created project at the right place and change the URL for the API as suggested.

private void Form1_Load(object sender, EventArgs e)
        {
            try
            {
                var jsonData = readData();
             
            }
            catch (Exception ex)
            {
                throw ex;
            }
        }
        private string readData()
        {
            try
            {
                string fileName = string.Format("{0}\\{1}", System.IO.Path.GetDirectoryName(Application.ExecutablePath), @"APIFile.json");
                if (!writeByteInFile(fileName, downloadData()))
                {
                    return string.Empty;
                }

                if (System.IO.File.Exists(fileName))
                {
                    string text = System.IO.File.ReadAllText(fileName);
                    return text;
                }
                return string.Empty;
            }
            catch (Exception ex)
            {
                return string.Empty;
            }
        }


        private byte[] downloadData()
        {
            WebClient request = new WebClient();
            byte[] downloadData = request.DownloadData(@"https://ABCRestfulWebAPI" /*replace with your vendor provided web API*/
            return downloadData;
        }

        private bool writeByteInFile(string fileName, byte[] byteArray)
        {
            try
            {
                if (System.IO.File.Exists(fileName))
                {
                    System.IO.File.Delete(fileName);
                }

                using (var fs = new FileStream(fileName, FileMode.Create, FileAccess.Write))
                {
                    fs.Write(byteArray, 0, byteArray.Length);
                    return true;
                }
            }
            catch (Exception ex)
            {
                return false;
            }

        }

You will find the .json file loaded to the bin folder of the solution:

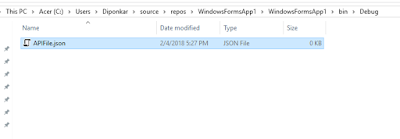
Fig 2: Loaded .JSON file from the Web API


Step 2: Insert data from the .json file to a table in the data warehouse by using MS SSIS

a)  JSON data format :  The JSON file that we downloaded by following step 1 is look like below fig:3

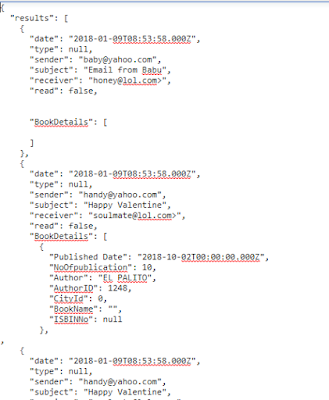
Fig 3: Read Json File

b) Parse and Transform the JSON Data

We are fortunate enough that, from MS SQL Server 2016 and on ward Microsoft has JSON capabilities where you can parse and transform the JSON data to SQL table format.

Write the below query to parse the JSON data and transform as like SQL table data.

SELECT [date]
      ,[type]
  ,sender
  ,[subject]
  ,receiver
  ,[read]


FROM OPENROWSET (BULK 'C:\temp\APIFile.json', SINGLE_CLOB) as j
CROSS APPLY OPENJSON(BulkColumn, '$.results')
WITH ([date] date
      ,[type] nvarchar(20)
  ,sender nvarchar(100)
  ,subject nvarchar(200)
  ,receiver nvarchar(400)
  ,[read]  bit

)

After running the above syntax you will find data like below:

Fig 4: After parsing JSON data it's exactly look like SQL table now


c) Make a SSIS package to run End to End

At last, create a SSIS package and include following steps to load the data into the table

i ) Process task is running to execute the .exe file created via step 1
ii) Moving json file to other location (It's best to keep the imported file at one place, but it's not mandatory)
iii) Data flow task to read data from json file, parse and transform it and  then load to the destination table (OLEDB source and OLEDB destination have been used to load the data to the table)

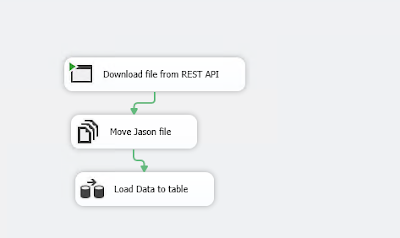
Fig 5. How SSIS package will load data to the table

Thursday, January 18, 2018

How to deploy SSIS package to Sql Server Integration Services Catalogs (SSISDB)?

Though there are different methods to deploy SSIS package, however; this blog post will cover how to deploy SSIS package to SSISDB. So far found, deploying to SSISDB is considered as best practice. SSISDB is introduced with SQL server 2012. The advantages you can have by using SSISDB as follows:
1) Easy to deploy from one environment to other
2) Report facilities in the SSISDB, so you can see execution time, error or whatever happend to your packages.
3) SSISDB is protected so your connection string and sensitive data is safe.

As per MSDN, "The SSISDB catalog is the central point for working with Integration Services (SSIS) projects that you’ve deployed to the Integration Services server. For example, you set project and package parameters, configure environments to specify runtime values for packages, execute and troubleshoot packages, and manage Integration Services server operations.The objects that are stored in the SSISDB catalog include projects, packages, parameters, environments, and operational history."

Let's divide the topic into two section 1) Creating Catalog 2) Deploy package to the catalog

Section 1: Creating catalog

step 1: Log into you Sql Server management studio and you will find the folder "Integration Services Catalogs", please create catalog as like below  fig 1:

fig 1: Create Catalog

Step 2: Create folder under Catalog:
Right click the newly created catalog 'SSISDB' and then create new folder with the different layers (e.g. staging, edw layer, data mart layer etc.)

fig 2: Folder under catalogue
After you create folder you will find  two new folders automatically created under the folder. It means if you create a folder called 'DSA' then you will find two folders  'Projects' and 'Environments' as like below Fig 2A
Fig 2A: folder under SSISDB


Section 2: Deploy package to the catalog

The below steps will assist you to deploy the package to the catalog.

Step 1: Build the solution and I am sure you all know how to build solution ;)

fig 3: build the solution
Step 2: Locate the .ispac file

fig 4: .ispac file

Step 3: Follow the wizard to deploy

Double click the .ispac file and then you will find below wizard:

fig 5: 1st page of the wizard

Choose the option project deployment and browse the .ispac file that you want to deploy.
fig 6: project deployment
Now you reach at the destination wizard where please  provide the destination server name (SQL server name where you will deploy the package) and then browse the path. When you click the browse for path you will find folder list from SSSIDB catalog (the folder you created at the section 1, step 2 of this post)

fig 7: choose destination path


So your package deployment is done to the SSISDB catalog.

SSISDB catalog has the opportunity to monitor the packages, you can create report from it. please find the below figure to generate the report:

fig 8: SSISDB catalog report