This article will describe how to add your local timestamp at the end of the each file in Azure Data Factory (ADF). In general, ADF gets a UTC timestamp, so we need to convert the timestamp from UTC to EST, since our local time zone is EST.
For example, if the input Source file name in SFTP is "_source_Customer.csv", then the expected outcome will be, "_source_Customer_2021-02-12T133751.csv". This means that the pipeline should add '_2021-02-12T133751' to the end of each file. This will work dynamically, which means that any file you pass from the source will have the timestamp added to it by using an ADF regular expression.
Let's set a simple pipeline and explain the scenario in a few steps. In this example, we receive files from an event based trigger and hold the file name in a parameter. The main part of this article is how to append the current date and time to the end of the file name we received. Please note that event based triggers will not be discussed here. If you like to know more about how to create trigger, please follow this link.
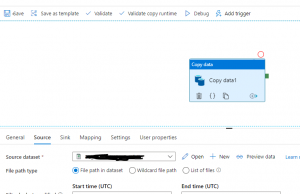
Step 1: Add Copy Activity
Create a simple pipeline with at least one Copy activity that connects a source and a sink, similar to what is shown in Fig 1.
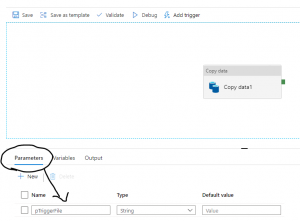
Step 2: Adding a parameter to receive the file name
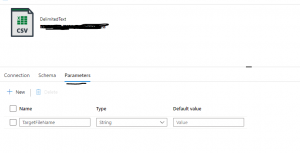
Step 3: Prepare the sink dataset
In the Copy data activity there is a Sink dataset that needs a parameter. Click on the Sink dataset and when it opens, you will find the view similar to Fig 3.

Step 4: Setting up a dynamic expression
Now, let's create the dynamic expression. As soon you hit the 'Add dynamic content', shown in Figure 5, you will able to write the expression that will convert the UTC timestamp to EST and then pad end of the file.
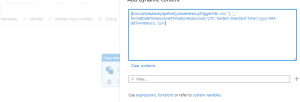
@concat(replace(pipeline().parameters.pTriggerFile,'.csv',''), '_',
formatDateTime(convertTimeZone(utcnow(),'UTC','Eastern Standard Time'),'yyyy-MM-ddTHHmmss'), '.csv')
Find out the explanation of the above expression.
- First we need to get the filename from the parameter, pTriggerFile. The value here will be: _source_Customer.csv
- Next we use REPLACE() to replace the .csv with empty string : replace(pipeline().parameters.pTriggerFile,'.csv',''). This case, we get: _source_Customer
- We need to get the timestamp. To do that, we convert utcnow() to EST with this function: convertTimeZone(utcnow(),'UTC','Eastern Standard Time')
- We want to format the date, and use this: formatDateTime(convertTimeZone(utcnow(),'UTC','Eastern Standard Time'),'yyyy-MM-ddTHHmmss'), which will return a value like: 2021-02-12T133751
- We put this all together with @concat(Step1,'_', 'Step4','.csv'), which will return _source_Customer_2021-02-12T133751.csv
We learned how to add local timestamp end of any file, though in this case, the source file was a .csv. However, you can follow the same process for .txt file where you only need to change '.csv' to '.txt' in the expression.