Showing posts with label data Warehouse. Show all posts

Saturday, February 12, 2022

How do you secure sensitive data in a modern Data Warehouse?

In 2019 Canadian Broadcasting Corporation (CBC) news reported a massive data breach at the Desjardins Group, which is a Canadian financial service cooperative and the largest federation of credit unions in North America. The report indicated, a "malicious" employee copied sensitive personal information collected by Desjardins from their data warehouse. The data breach compromised the data of nearly 9.7 million Canadians.

Now the question is, how do we secure data warehouses so that employees of the same organization can't breach the data? We need to make sure sensitive data is protected inside the organization.

When any IT solution is built in an organization, there are two types of environment that exist, one is called non-production and the other is a production environment. Production and non-production environments are physically separated. A non-Production Environment means an environment for development, testing, or quality assurance, and the solution is not consumed by end-users daily basis from a non-production environment. However, the Production environment is a place where the latest version of the software or IT solution is available and ready to be used by the intended users.

As stated at the beginning, a rogue employee was involved in the massive data breach at the Desjardins Group. Hence; an organization building a data-driven IT solution needs to work on setting up both Production and Non-Production environments secure way. This article will describe how sensitive data can be protected in both the Production and Non-Production environments.

A. Protecting Sensitive Data in Non-Production Environment in a Data Warehouse:

In general, a Non-Production environment is not well guarded with security. Different personas can have access to a Non-Production environment in a data warehouse e.g. Developers, Testers, business stakeholders. 

So it's important to protect sensitive data inside the organization. The very first thing we need to do is whenever copying data from any application to a data warehouse (non-production environment) sensitive data need to be scrambled. 
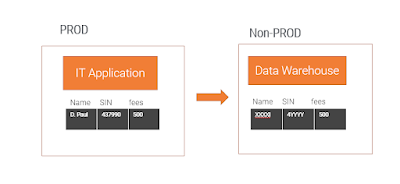
Fig 1: Moving data from IT application to non-prod data warehouse

There are a few steps that can help us to scramble the data in  Non-Production Environment in a Data Warehouse:

Step 1: Business or data steward find the list of sensitive or Personal Identifiable Information (PII) data

Step 2: Data Engineer or ETL Developer will use any standard tool like Azure Data Factory (ADF) to mask the data and store it in the data warehouse.

Step 3: Either Test Engineer or Business Stakeholder will verify all the sensitive columns in the database before it releases to the rest of the team.


B. Protecting Sensitive Data in Production Environment in a Data Warehouse:

In a Production environment, we can't scramble the data in such a way that is irreversible. We need to keep the original data intact but make sure only the intended users have access to the data. So if we can mask the columns that hold sensitive or PII data in such a way so that only privileged users get access to the data. Below figure shows what is expected from the solution:
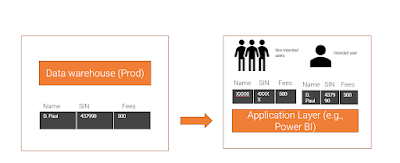


Fig 2: Protect sensitive data from Data Warehouse (PROD)


As shown in Fig 2, when users try to access the data via an application such as Power BI, only intended users will be able to see the intact data. Non-intended users will find the data obfuscated. The above-explained process can be done by using dynamic data masking provided by Microsoft Databases. The process only masks the data on the fly at the query time. If you would like to learn about dynamic data masking, please follow the Microsoft document.

In Summary, whenever PII data is taken from the operational system to the Non-Production environment to build any analytics solution data need to be scrambled. And in a Production environment, though dynamic data masking can prevent viewing the data by unintended users, however; it's important to properly manage database permission on the Data Warehouse. As well as, make sure to have auditing enabled to track all activities taking place in the Data Warehouse in the Production environment.


Wednesday, December 25, 2019

Environment variable setup in SSIS Catalogue

If your SSIS solution is built with project deployment mode(not package deployment mode) and would like introduce environment variable then this post is for you.

Let's start with a few steps before going into environment variable. In general, after building  SSIS solution, you get .ispac file which you take from DEV to UAT/TEST/PREPROD/PROD environment. And then by following the wizard you deploy the .ispac file under SSIS catalogue.  To know step by step process to deploy SSIS package to catalogue please follow : Deploying SSIS package to Catalogue

After deployment , you will find the packages under SSIS catalogue, as like below figure 01:


Fig 01: SSIS Catalogue


At next step you will create  job/Jobs  to run the packages. Now say, if you don't create any environment variable then the job will like below:

Fig 2: Job Properties without Environment variable

Will this job execute without environment variable? Surely, it does. But the connection string still retain development server information. However, the solution is already moved to UAT or Test Environment, so you need to change the connection string manually.   If  Environment variable have been defined then it can be assigned to the job so the same job (process) can run for different environment (UAT/Pre-PROD/PROD) by pointing the right environment.

Job with environment variable look like below figure 3:


Fig 3: Job with Environment variable

At this setup, you can choose from different environments before running the job. And each environment can hold different source and target database as well as source and destination file location. Now let's see how to create the environment  variable.


Step 1: Create environment variable
Under SSISDB, you will find Environment folder as like below picture, right mouse click and follow the step.

Fig 4: Create environment variable


Step 2: Property set up for environment variable

At this step, you will define connection strings, source/destination file path etc.

Fig 5: setup properties for environment


Step 3: Connect environment variable from project, Under SSISDB catalog choose the project and then right mouse click to find 'Configure'.

Fig 6: Configure environment variable


And then add reference to the project, References->Add and then environment can be chosen.

Fig 7: adding environment variable reference to the project


Step 4: From step 1 to 3, we worked with SSISDB, Now let's look at the job, SQL Server Agent->Jobs, where will have option to choose from environment

Fig 8: Job Properties
And from the properties, click on Steps and then you will find variable to choose from.


In this example, only UAT environment have been created but as per your need Pre-PROD, PROD can be created and source and target database can be assigned accordingly. And those environment can be assigned to job.

Saturday, November 16, 2019

SQL Server: Easy way to add Columns to Multiple tables

When you work in Data Warehouse/BI Project or any project where database is required and you are in a situation where need to add one or more same columns to the tables you already built then this post will help you to achieve the goal quicker and error free.

For example a BI project you may working with require to add load timestamp to all the target tables which at the design phase somehow missed or you find out at the later part of the project that you require one or two particular columns to all the tables.

Boring task!!! right?? Going through all the tables and changing it one by one is time consumable and error prone.  For example if you have 50 tables and you need to add one column say column called 'UpdatedAt'. How do we do it by using SQL script?

You need to list all the table name and run the below query by replacing the table name e.g. 'testTable1', 'testTable2' etc.
 
             Declare @tbl_name as varchar(100)
              Declare @tsql_code Varchar(500)

              Declare cur_table cursor local for
                           select name
                           from sys.tables
                           Where name in ('testTable1','testTable2')
                           order by 1
                           for read only

              open cur_table
              fetch cur_table into @tbl_name
     
                           while @@fetch_status = 0
                           begin
                               
                           Select @tsql_code='Alter Table ' + @tbl_name  +' Add Col1 Varchar(10), Col2 Varchar(10)'
                           Exec (@tsql_code)
                           fetch cur_table into @tbl_name
                           end
                     close cur_table
                     deallocate cur_table


However,  the above code may not work since schema name is missing there, so you need to add the schema name along with the table name like below example:

   Declare @tbl_name as varchar(100)
              Declare @tsql_code Varchar(500)

     Declare cur_table cursor local for
                           select '['+SCHEMA_NAME(schema_id)+'].['+name+']'
                           from sys.tables
                           Where SCHEMA_NAME(schema_id)+'.'+name in ('dbo.Currency','dbo.Sales')
                           order by 1
                           for read only

              open cur_table
              fetch cur_table into @tbl_name
     
                           while @@fetch_status = 0
                           begin
                               
                           Select @tsql_code='Alter Table ' + @tbl_name  +' Add UpdatedAt [DATETIME]'
                           Exec (@tsql_code)
                           fetch cur_table into @tbl_name
                           end
                     close cur_table
                     deallocate cur_table


Hope this will make your life easier.

Sunday, October 20, 2019

SSIS: Execute SQL Task Limiation

I would like to share an experience that found recently. In general, when you work with SSIS and using SQL Execute task, you tend to make query by using  SQL Server Management Studio (SSMS) and when query works fine then copy the code into the Execute SQL Task. However,  when I copied the code and pasted to Execute SQL task and run the package it failed at Execute SQL task, then figure it out only part of the SQL code is pasted.

Fig 1: SQL Execute Task


The SQL code I copied was around 1600 lines, however when pasted it's only took 891 lines of code to Execute SQL Task and rest have been discarded. It means Execute SQL task got limitation, out of curiosity took the pasted part of the code from Execute SQL task then count it and found it can hold up to 30,987 characters with space. (see below fig 2)

Fig 1: SQL Execution task limiation


How do you solve it?
Well, It's easy, you wrap the SQL code either by using view or store procedure and then use that in your Execute SQL task.


Sunday, September 15, 2019

Referential Integrity in Data warehouse Design?

I was involved in a project and the project was asking about implementing referential integrity for the data warehouse design. I was surprised, since I never did such design for Data Warehouse(DW).

If someone ask you to put the referential integrity in your data warehouse project, how do you explain them that it's not required for DW project?

If you design the control /config tables to maintain logs or control the flow of your ETL run then you may follow the referential integrity for only those tables, but when you start working with data load for the tables, don't go with referential integrity which will kill the performance.

So No 1 : Poor performance while loading

If your DW tables (dimensions and facts) have referential integrity which will consume extra time to insert or update the records. So standard for data warehouse design is, you don't maintain referential integrity.

Let's explain why you don't need it?

When you are doing dimensional modeling it's not require that you need to have referential integrity because ETL does it for you. The ETL process is the source of all key values that will be inserted into the Star or Snowflake model. Any ETL process should have surrogate keys in the dimension tables and while loading facts natural keys will be transformed with those surrogate keys from dimension. Any data that would violate referential integrity will be caught by these process.

In summary, If your ETL is built correct then you don't need to have referential integrity in the Data Warehouse design.


Saturday, August 24, 2019

Table variable using in SSIS packages

When you need it and how to use it?

As you may know table variable is similar to temp table in Microsoft SQL, however; table variable generally uses fewer resources. I am going to explain when table variable could be useful at the time of SSIS package development.

Scenario 1: When you need to store data like array and need to use it later in your SSIS package

For example, below scenario I only had to insert/update data where the periods exist in the source data and then making next operation depend on the value exist or not.

DECLARE @periodACD TABLE (periodACD char(2))

INSERT INTO @periodACD

SELECT Distinct [PERIOD]

FROM [ETL].[SourceTable];


SELECT CASE WHEN periodACD='4' THEN 'Insert or update for April'  END /*You can use any transformation or calculation at THEN clause.*/
FROM @periodACD WHERE periodACD='4'


Scenario 2: Keep insert or updated row count for logging purposes while you use SQL Merge

For example, you are using merge to update the dimension and want to catch the number of rows you insert, you can use table variable to store the data for merge.

DECLARE @RowCount TABLE (InsertedID INT) --Declare Table variable

MERGE  [Dim].[Table] AS Target
 USING    [Staging].[Data] as Source
    ON Target.SourceID = Source.SourceID --BusinessKey
WHEN MATCHED

AND (ISNULL(Source.SourceName,'')<>ISNULL(target.[BrandDesc],'')
OR ISNULL(Source.SourceDate,0)<>ISNULL(Target.SourceDate,0)
        OR ISNULL(Source.SourceBit,'')<>ISNULL(Target.SourceBit,'')
   
THEN
   UPDATE SET Target.SourceName = Source.SourceName,
  Target.SourceDate = Source.SourceDate,
  Target.SourceBit = Source.SourceBit

OUTPUT inserted.SourceID 'InsertedID' INTO @RowCount; --output IDs for rowcount

SELECT COUNT(*)
FROM @RowCount

Saturday, July 20, 2019

New to Git and Github? How Azure DevOps connect with Git? Must know.


Those who have been using TFS for a long and now you know 'Git' is a 'thing' that you can't avoid.  When you start with Git, please don’t expect it will be exact same like TFS. When I have started with TFS 10 years back, it was super easy to start with, however for Git, start with a mindset that, command line is required.

As you know Git, other name come along which is 'GitHub' and then confusion grows. 
Many people think Git and GitHub are the same, But it’s not. Git is the version-Control software and GitHub is your storage with sharing capability. If you don’t want to share your code with anyone but still having versions maintenance you don’t need GitHub (which is unlikely though). Moreover, alternative to GitHub you can use Azure DevOps.

Those of you used to work with TFS, maybe already got to know about Azure Devops which give you option to either use Git or TFS as your version-control tool. It means in this scenario, you don’t need GitHub. Below picture depicts Git relate with Azure DevOps and GitHub.

Fig 1: Git, GitHub and Azure Devops

Let's start with beginner steps to work with Git.

Step 1: Install Git at your PC.
Follow the link and choose your right platform to download the file and then install it.
https://git-scm.com/downloads

Step 2: Open the Git command window, which look like below

Fig 2: Installed Git software

Now, you would like to create a solution or file which you would like to add to the Git and would like to work with other colleagues.

Adding file to Git means, the folder where you keep the files/code should be recognized by Git. To achieve that, you need to do following:

For example, your code is located under C\Code and you want to make this as Git repository.

After opening the Git Bash, write below command:

1 cd C:\                                                                                                            

2 cd Code
3 git init

Now the folder is ready to use as Git repository

'Initialized empty local Git repository in C:/Code/.git/'

And you will a find a git folder created in the folder C:/Code/

Now you can copy all your files under the folder C:/Code and let's add a file to the local Git repository.

4. git add Testcode.txt

and Commit the code in local repository

5.  git commit -m 'added test file'


Now your solution or all code files is under git repository, If you work on your own and wanted to have version control so you can always go back to your earlier code, which is ready at this stage.

Step 3:
Let's get to the next step where you would like to push this code to either Github or Azure Devops. In my case I have uploaded the code to Azure DevOps.

How do you do this?

Login to the Azure devops : https://dev.azure.com/

Create repository , choose Type as 'Git'

Fig 3: Create repo under Azure Devops
After finishing the repository creation, you will find like below window, where you need to copy the command line code.


Now go back to your  'Git Bash' command window, and write two lines of code:

6. git remote add origin https://d*****@dev.azure.com/dpaul0628/DpaulGithub/_git/LoveGit
7. git push -u origin –all

Now if you login to the Azure DevOps, you will see the local file you have committed earlier is uploaded to the Azure DevOps.

Saturday, June 29, 2019

Creating script along with Data for database objects- Why require? and Easy way to accomplish.

Sometimes you may have a table which have populated by business or tech to support the solution you develop. This type of table can be called as Master data table which is not derived from any source system. So whenever you need to move table DDL/script to higher environment (from DEV to UAT or PROD) you need to move not only DDL but also data for that table.

Now let's find out How do you do it?

There are a few ways to do it but my preferable way to do it by using SQL Task, we mostly use this for generating scripts; however, it can also take the data.

Step 1: Select the database and find generate script option
Fig 1: Finding out generate scripts for the database
Step 2: Follow the wizard
Fig 2: Go thought the wizard
Step 3: Choose the database object, the table you would like to move to the higher environment. And click Next.
Fig 3: Choose your database object
Step 4: Before you generate the script, you also need to have data,so click at the 'Advanced' button.
Fig 4: Advanced scripting options
Step 5: Change 'Type of data to script' to Schema and data
Fig 5: get schema and data together


You are almost done, after completing the addition few steps in the wizard script will be ready with DDL and data. Now you can move the saved file to the upper environment and run the script, you will find table and data together.


Sunday, May 19, 2019

When and why unpivot require for your Data Warehouse(DW) project?

You may involve with a Data warehouse (DW) project where you find source system got many repeated columns in a table which can be reduced to a few columns table. It's not only reducing the number of columns rather you would like to find out attributes those can be aggregated for the reporting purpose, in DW world, which will be your fact attributes. Let's start with an example:

In Medical data, Hospital can have different type of emergency bed type e.g. below table holds bed availability data for different type of bed.

Fig 1: Hospital Bed data

Let's make a table with above data, use below SQL query to populate the data.

create table #HospitalBed (TranID int,SubmissionDate datetime, GenAcuteCom int, 
ShortstayCrisisComp int, MoodAnxietyComp int, EatDisorderComp int)

 insert into #HospitalBed
 select 101,getutcdate(),10,3,9,4
 union 
 select 102,getutcdate(),5,6,2,8
 union 
select 104,getutcdate(),6,3,9,1
 union 
 select 105,getutcdate(),5,6,2,8


If you would like to get the data under, SELECT * FROM #HospitalBed

Fig 2: Data from Table

Now to fit this data for data warehouse model, we can clearly see columns need to turned into rows. These different type of bed should go under one column called 'BedType' and values for those columns  under another column can be called 'complementbed'. Now how do we do it? We have function in SQL called 'unpivot', we are going to use the function to populate expected data set.

select u.tranID, u.Bedtype, u.complementbed
from #HospitalBed s
unpivot
(
  complementbed
  for Bedtype in (GenAcuteCom, ShortstayCrisisComp, MoodAnxietyComp,EatDisorderComp)
) u;

Fig 3: After unpivot

As you can see , after applying UNPIVOT you get more rows but column got reduced.

But what is the benefit? This will help to make dimensional model easy, where all these BedType can be kept in a dimension table and fact table can have the key of BedType along the with ComplementBed value. Below Fig (4) shows how dimensional model can be established for the earlier mentioned source table (Fig 1) eventually.

Fig 4: Sample Dimension and Fact table 


And consider the source table we started have 4 different type of bed, however, it could be around 20 columns and more. Dimensional model can be super complicated and even may not able to build proper dimensional model without transposing the columns into rows for the above scenario,

Sunday, April 21, 2019

Misleading popup message in SSIS solution can give you trouble!!

SQL Server Data Tools (2017) is smart and trying to help you many ways. But sometime performance improvement popup message can lead you to some other issue.

I would like to share my experience recently, I was working with SSIS packages and at the end of the day commited and pushed the code to github successfully. But very next day when I opened the solution, surprisingly got incompatibility error (Fig 1), I was not able to open the project.

Fig 1: Solution incompatibility error.
I was really surprised, and trying to remember what I did wrong which may causes the issue. The project incompatible (Fig 1) generally happens when Visual studio version miss match. I did not do any update !! My mind was stuck for a while then recall that I clicked a pop up message in SSDT last day even can't remember what I responded. 

The pop up message was the below one (Fig 2). And I surely clicked 'Disable this extension'.

Fig 2: Misleading pop up
Pop up message in SSDT also says 'Disabling it may improve your experience' (Fig 2). I did not pay close attention and trusted the part where saying it may improve the performance which is misleading. And this causes the solution turned into incompatible.

How to solve this issue?

There are two ways you can solve:

1) Repair the software or 2) Enable the extension

1) Repair the software

You can execute the SQL server data tools (SSDT-Setup-ENU.exe) and click repair as like below figure 3, complete a few steps in wizard. When repair is done then open the solution, now compatibility error will go away.
Fig 3: Repair SSDT

2) Enable the extension
Please open SQL Server Data Tool and go to Tools->Extension and updates. You will find 'Micoroft Integration Services Project' extension is Disabled (Fig 4), so you need to enable the extension,


Fig 4: Extension and update


Saturday, March 16, 2019

Unions in OLEDB Source can kill performance in SSIS, How to handle this?

If you write SQL with many UNION in OLEDB source transformation then you will find the SSIS package is running slow.

For example, you may require many SQL unions to populate the data set as like below:
SELECT x,y,z,z1,z2
FROM tblA

UNION
SELECT x,y,z,z1,z2
FROM tblB

UNION
SELECT x,y,z,z1,z2
FROM tblC

UNION
SELECT x,y,z,z1,z2
FROM tblD

UNION
SELECT x,y,z,z1,z2
FROM tblN


Fig 1: OLEDB source 

Instead of using the above SQL in OLEDB source, you can use Union All transformation which is much faster in compare with using the SQL code in OLEDB source.

Fig 2: Union All Transformation


Saturday, February 16, 2019

SQL Analytical Function: Teradata Vs. MS SQL syntax

A few years back, I posted about Teradata analytical function where I described how this works and why we need to use analytical function :  https://pauldhip.blogspot.com/2014/12/analytical-function-rownumber-with.html

However, this post includes SQL syntax for MS SQL and how it's different from Teradata.

The SQL Code I have written in Teradata in my earlier post to find latest version of the data by using below:
select INDUST_CODE,INDUSTRY_NAME
from INDUSTRY
QUALIFY
row_number() Over (partition by INDUST_CODE order by ACTIVATE_DATE desc)=1

Do you think, the above syntax will work in MS SQL? Not really!! MS SQL doesn't have QUALIFY function. You need to write the syntax a little different way and  a few extra lines required to achieve same results.

Let's translate the above syntax for MS SQL:

SELECT INDUST_CODE, INDUSTRY_NAME, RANKRESULT
FROM(
SELECT  INDUST_CODE, INDUSTRY_NAME ,
RANK() OVER (PARTITION BY INDUST_CODE ORDER BY ACTIVATE_DATE DESC) AS RANKRESULT  
 FROM INDUSTRY
) TT
WHERE TT.RANKRESULT=1 

As you see, for MS SQL we had to use sub query and RANK function to achieve the same result we got in Teradata.

Wednesday, November 7, 2018

SQL: Pay attention when using Group by and CASE WHEN statement together

When you are working with SQL and having case when statement together with 
group by then please have a close look at the what are you putting in the case
when statement. 

For example, Cases like below is pretty much straight forward:
 
Select cust_key,
       Cust_site_key,
       Max(rating_key) as rating_key
From Customer_rating
Where year=2018
Group by 1,2
 
However, Now let's look at the below code and see if you find any issue with
this code.

Select
event_key,
Event_code,
CASE Event_code
   When ‘start’ then min(f.event_date_key)
   When ‘Closed’ then max(f.event_date_key)
ELSE
   f.event_date_key
END as c 
FROM
Event_fact f
Join
event_dim ed
On
f.event_key=ed.event_key
Group
by event_key,Event_code


After running above code you will get error with "Failed
3504: Selected non-aggregate values must be part of the associated group."

What can go wrong? Well, you may think; event_date_key is using aggregate
function (min and max) so you don't need to use group by with 
event_date_key. However, if you look closely then will find ELSE part of the CASE
statement also using the event_date_key where no aggregation applied. It means 
we need to use group by with event_date_key.

Hence the correct code will be:
Select
event_key,
Event_code,
CASE Event_code
   When ‘start’ then min(f.event_date_key)
   When ‘Closed’ then max(f.event_date_key)
ELSE
   f.event_date_key
END as c 
FROM
Event_fact f
Join
event_dim ed
On
f.event_key=ed.event_key
Group
by event_key,Event_code,event_date_key

Friday, June 15, 2018

MS Analysis Services:How to sync SSAS Cube?

When business users accessing a SSAS cube by connecting via excel or any other front end tool and at the same time if you process the cube then user can be affected badly. User simply can't access the cube if you are processing the same.

To avoid the above scenario, we can have two different SSAS server, one for Processing and other for Query. Business user should connect the Query server. So while you processing the cube it will update the Processing server; so user  can't be affected while you are processing the cube since user will be connected with Query server.

Today's writing will cover how to sync cube from one server to other.

Step 1: Find the Query server where you want to sync.

Click at the database of the server and then click Synchronize as like below fig 1

Server->Database->Synchronize

Fig 1: Sync to the Query server


Step 2: Synchronize wizard

At this step it explains what do you with the wizard


Fig 2: synchronize wizard

Step 3:  Choose the server from where you would like to sync which can be your processing server and Destination server will be automatically chosen.


Fig 3: Choose source and Destination to Sync

Step 4: Specify location for the partition, you can leave as default

Fig 4: location for partition

Step 5: Choose security roles and members

You need to take this part as per your need, if you don't want to copy any role and security from the processing server then you can choose third option 'Ignore all'. And if you want role need to copied but not members then choose 2nd option.

Fig 5: Choose what to Copy from processing Server


Step 6: Save script or Synchronize

At this last step, you can either start synchronize or generate the script to save in a file for later uses.
Fig 6: Last step of synchronization

You may choose Synchronize now, however; you can copy the script so that you can add the script to a SQL Server Agent job. 

Why do you create SQL Server Agent job?

If you need to sync the cube from Processing server to Query server time to time then creating job will be the best solution. Hence, the script saved from step 6 can be used to create a job. And whenever you need to sync the cubes you can run the job.


Wednesday, February 14, 2018

How to load data into Data Warehouse from a RESTful API

While you are working with data warehouse/ BI development, sometimes you may need to load data from API. The API can be RESTful or SOAP web service. However, this post cover how to load data from RESTful API which return a .JSON file and then insert the data from the .JSON file into a table in Data Warehouse.

Tool uses: Visual Studio 2017 Windows Application (C#), SSIS, MS SQL Server 2016 +

Steps includes:
1) Load data from Web API (REST) and save as .json file by using  Visual Studio 2017 Windows Application (C#)
2) Insert data from the .json file to a table in data warehouse by using MS SSIS


Details of the steps are followings:


Step 1: Load data from Web API (REST) and save as .json file by using  Visual Studio 2017 Windows Application (C#)

a) Create a visual studio solution by selecting Windows Form Apps under Windows Classic Desktop as like below figure 1.

Fig 1: Create VS solution to load data from Web API
b)  Code Behind to call web service and generate the .JSON file

Please copy the code and paste into your newly created project at the right place and change the URL for the API as suggested.

private void Form1_Load(object sender, EventArgs e)
        {
            try
            {
                var jsonData = readData();
             
            }
            catch (Exception ex)
            {
                throw ex;
            }
        }
        private string readData()
        {
            try
            {
                string fileName = string.Format("{0}\\{1}", System.IO.Path.GetDirectoryName(Application.ExecutablePath), @"APIFile.json");
                if (!writeByteInFile(fileName, downloadData()))
                {
                    return string.Empty;
                }

                if (System.IO.File.Exists(fileName))
                {
                    string text = System.IO.File.ReadAllText(fileName);
                    return text;
                }
                return string.Empty;
            }
            catch (Exception ex)
            {
                return string.Empty;
            }
        }


        private byte[] downloadData()
        {
            WebClient request = new WebClient();
            byte[] downloadData = request.DownloadData(@"https://ABCRestfulWebAPI" /*replace with your vendor provided web API*/
            return downloadData;
        }

        private bool writeByteInFile(string fileName, byte[] byteArray)
        {
            try
            {
                if (System.IO.File.Exists(fileName))
                {
                    System.IO.File.Delete(fileName);
                }

                using (var fs = new FileStream(fileName, FileMode.Create, FileAccess.Write))
                {
                    fs.Write(byteArray, 0, byteArray.Length);
                    return true;
                }
            }
            catch (Exception ex)
            {
                return false;
            }

        }

You will find the .json file loaded to the bin folder of the solution:

Fig 2: Loaded .JSON file from the Web API


Step 2: Insert data from the .json file to a table in the data warehouse by using MS SSIS

a)  JSON data format :  The JSON file that we downloaded by following step 1 is look like below fig:3

Fig 3: Read Json File

b) Parse and Transform the JSON Data

We are fortunate enough that, from MS SQL Server 2016 and on ward Microsoft has JSON capabilities where you can parse and transform the JSON data to SQL table format.

Write the below query to parse the JSON data and transform as like SQL table data.

SELECT [date]
      ,[type]
  ,sender
  ,[subject]
  ,receiver
  ,[read]


FROM OPENROWSET (BULK 'C:\temp\APIFile.json', SINGLE_CLOB) as j
CROSS APPLY OPENJSON(BulkColumn, '$.results')
WITH ([date] date
      ,[type] nvarchar(20)
  ,sender nvarchar(100)
  ,subject nvarchar(200)
  ,receiver nvarchar(400)
  ,[read]  bit

)

After running the above syntax you will find data like below:

Fig 4: After parsing JSON data it's exactly look like SQL table now


c) Make a SSIS package to run End to End

At last, create a SSIS package and include following steps to load the data into the table

i ) Process task is running to execute the .exe file created via step 1
ii) Moving json file to other location (It's best to keep the imported file at one place, but it's not mandatory)
iii) Data flow task to read data from json file, parse and transform it and  then load to the destination table (OLEDB source and OLEDB destination have been used to load the data to the table)

Fig 5. How SSIS package will load data to the table

Saturday, September 30, 2017

Return NULL value from empty table

You may come at the situation where you need to return NULL even if your table is completely empty. For example, you need to make an action depend on if the table's column has value or not., it's generally the case, when you would like to load the data in your data warehouse for the first time and then extract delta every day.

Fig 1: Make action depend on the tab'e's data

From the above case, we need to check if a column of the table has value or not. We have created a table which is empty.

Fig 2: Empty Data set

Now if you would like to produce a value when there is no data in a table, you can return NULL.

There maybe many ways to find out , but my preferable way will be

Approach 1:

select case when count(1)=0 then NULL else 1 end from dbo.[TimeStamp]

In case you need to pass parameter then:

select case when count(1)=0 then NULL else 1 end from dbo.[TimeStamp] where TableName='Table1'

Approach 2:

select
  (select [MaxTimeStamp] from dbo.[TimeStamp] ) as [MaxTimeStamp]

In case you need to pass parameter then:

  select
  (select [MaxTimeStamp] from dbo.[TimeStamp] where tablename='table1') as [MaxTimeStamp]


You can use any one of the syntax to return NULL whenever you need it.

Wednesday, January 18, 2017

MERGE in SQL is a good friend for Data Warhouse

If your need is SCD2 type table, where you would like to keep the history. Then SQL merge could be your good friend. You could produce history with different way but SQL merge is clean; it's one placeholder for inserting and updating the data.

Lets start with very simple example, in data warehouse many of your table must need to hold history where you take each full load at the first load and then you start loading delta each day. In data warehouse you have many layers but in my example, it's source and target table is taken.

Step 1: Creating Source Table
First make a source table:
Create table Source_Table (id int, ename varchar(50), UpdateDate DateTime);

Step 2: Creating Target table
We need to make Target table to load the data

Create table Target_Table (id int, ename varchar(50),EFF_DT date, END_DT date)

Step 3:  Merge Actions in general
Merge have three different actions, those are INSERT, UPDATE and DELETE.

Below SQL query will show the current inserted row to the table, you don't need to write select * from syntax.

insert into Source_Table
OUTPUT INSERTED.*
values (1,'Diponkar',getdate()), (2,'San',getdate()), (3,'Derek',getdate()), (4,'Paul',GETDATE())

Fig 1: OUTPUT from the Insert                 


Step 4: Data warehouse Full load/Init load

Since we don't have any data in the target table. So, if we execute below merge query it will only affect the insert part of the merge.

Merge target_Table T
Using Source_Table S
on (S.id=T.id)
When NOT Matched
Then insert (id,ename,EFF_DT,END_DT)
values(S.id,S.ename,GETDATE(),'2999-12-31')
When Matched
Then Update SET T.ename=s.ename
OUTPUT $action, DELETED.*, INSERTED.*;

And we are able to see what is ACTION of this merge.

Fig 2: Merge Action


Above figure 2, clearly shown that only insert action is taken place by the merge,

Step 5:   Delta load
Source data is daily delta data, so we can delete the old data from source table and insert two new rows. One with new key and other with existing key.

delete from Source_Table

insert into Source_Table (updated data with same business key)
values(1,'Dipu2',GETDATE())

insert into Source_Table (completely new row)
values(5,'Drina',GETDATE())

Data in the source table is like below:

Fig 3: Delta load


Now, lets run the below merge query and catch the action:

Merge target_Table T
Using Source_Table S
on (S.id=T.id)
When NOT Matched
Then insert (id,ename,EFF_DT,END_DT)
values(S.id,S.ename,GETDATE(),'2999-12-31')
When Matched
Then Update SET T.ename=s.ename
OUTPUT $action, DELETED.*, INSERTED.*;


There should be one insert and one update, lets have a look at the output:

Fig 4:Output after merge applied


Step 6: Data in the target table
As we see from the below fig: 5, merge query updated the target table accordingly.

Fig 5: Insert and Update shown