Showing posts with label Azure Data Factory. Show all posts

Sunday, February 5, 2023

How to implement Continuous integration and delivery (CI/CD) in Azure Data Factory

Continuous Integration and Continuous Deployment (CI/CD) are integral parts of the software development lifecycle. As a Data Engineer/ Data Professional when we build the ETL pipeline using Azure Data Factory (ADF), we need to move our code from a Development environment to Pre-Prod and Production environment. One of the ways to do this is by using Azure DevOps.

Target Audience:

This article will be helpful for below mentioned two types of audiences.

Audience Type 1: Using DevOps code repository in ADF but CI/CD is missing

Audience Typ 2: Using ADF for ETL development but never used DevOps repository and CI/CD

For Audience Type 1 you can follow the rest of the blog to implement CI/CD. And for audience type 2, you need to first connect ADF with the DevOps repository, and to do so please follow this blog post and then follow the rest of this blog post for the CI/CD.

This blog post will describe how to set up CI/CD for ADF. There are two parts to this process one called 1) Continuous Integration (CI) and 2) Continuous Deployment (CD).

1) Continuous Integration (CI)

First, you need to log in to the Azure DevOps site from your organization and click the pipelines as shown in fig 1.

Pipeline creation

Fig 1: DevOps pipelines

And then click “New pipeline” as shown in fig 2

New Pipeline

Fig 2: New pipeline creation

And then follow the few steps to create the pipeline:

Step 1: Depending on where your code is located, choose the option. In this blog post, we are using the classic editor as shown below in fig 3.

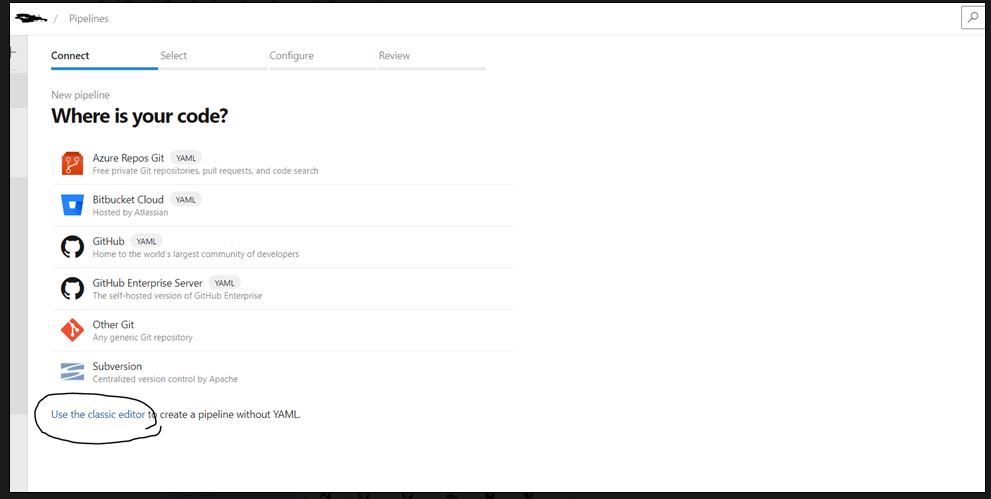
Fig 3: Choose the right source or use the classic editor

Step 2: In this step, you need to choose the repository that you are using in ADF and make sure to select the default branch. We have chosen ADF_publish as a default branch for the builds.


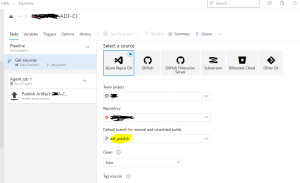
Fig 4: selecting the branch for the pipeline

Step 3: Create an Empty job by clicking the Empty job as shown in below figure 5

Fig 5: Selected Empty job

Step 4: You need to provide the agent pool and agent specification at this step. Please choose Azure Pipelines for the agent pool and windows latest for the Agent specification as shown in figure 6.

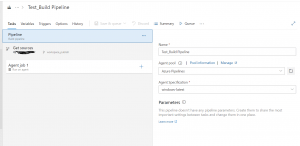
Fig 6: Agent pool and Agent specification


Now click "Save and Queue" to save the build pipeline with the name “Test_Build Pipeline” as shown below figure:

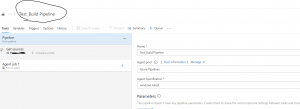
Fig 7: Saved the build pipeline

The build pipeline is completed, and the next part is creating the release pipeline which will do the continuous deployment (CD) means the movement of the code/artifacts from Development to the pre-prod and Production environment.

2) Continous Deployment (CD)

The very first step of Continuous Deployment is to create a new release pipeline. And this release pipeline will have a connection with the previously created build pipeline named "Test_Build Pipeline".


 Fig 8: Release Pipeline

As soon as you hit the new release pipeline following step will appear. Please close the right popup screen and then click +Add on the artifact as shown below figure:


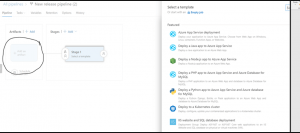
  Fig 9: Create the artifact

Next step to connect the build pipeline and the release pipeline, you will find out the build pipeline that you created at the CI process earlier and choose the item “Test_Build Pipeline”


Fig 10: connecting the build pipeline from the release pipeline

Click on Stage 2 and select an empty job as shown in fig 10

empty job
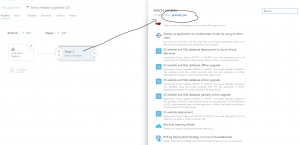
  Fig 11: Empty job under release pipeline

After the last steps the pipeline will look like the below, now please click on 1 job, 0 tasks. We need to create an ARM template deployment task

job and tasks

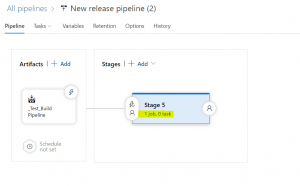
Fig 12: Release pipeline job and task

Search for ARM template deployment, as shown in fig 13. ARM template Deployment task will create or update the resources and the artifacts e.g. Linked services, datasets, pipelines, and so on.

search for ARM template
  Fig 13: search for the ARM template

After adding the ARM template, you need to fill in the information for 1 to 12 as shown in the below diagram:

ARM template configuration

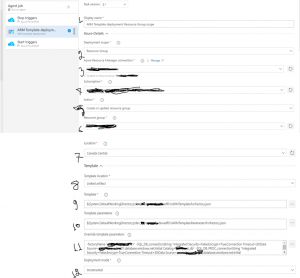
Fig 14: ARM Template information

  1. Display Name: Simply put any name to display for the deployment template
  1. Deployment Scope: You have options to choose the deployment scope from Resource Group, Subscription, or Management Group. Please choose Resource Group for ADF CI/CD.
  1. Azure Resouce Manager Connection: This is a service connection; if you already have a service principal you can set up a service connection or create a completely new one. The Cloud Infrastructure team in your organization can set it up for you. You will also find details about Service Connection in Microsoft Learn.
  1. Subscription: Please choose the right subscription where the resource group for the ADF instance resided for the pre-Prod or Production environment.
  1. Action: Please Choose "Create or Update resource group" from the list.
  1. Resource Group: The resource group name where the ADF instance is lying.
  1. Location: Resource location e.g. I have used Canada Central
  1. Template Location: Please choose either "Linked Artifact" or "URL of the file". I have chosen "Linked Artifact" which will connect the ARM template which is already built via Continuous Integration (CI) process.
  1. Template: Please choose the file "ARMTemplateForFactory.json"
  1. Template parameters: Please choose the template parameter file: "ARMTemplateParametersForFactory.json"
  1. OverrideTemplate Parameters: Make sure to overwrite all the parameters including pre-prod or production environment's database server details and so on. Go through all the parameters that exist in the Development environment you need to update those for the upper environments.
  1. Deployment mode: Please choose "Incremental" for the Deployment mode.

After putting all the above information please save it. Hence your release pipeline is completed.

However, to make this pipeline runs automated, means when you push the code from the master to publish branch you need to set up a Continuous deployment trigger as shown in fig 15

release trigger

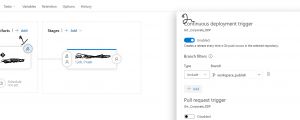
fig 15: Continuous deployment Trigger


The last step of the CD part is creating a Release from the Release pipeline you just created. To do so please select the Release pipeline and create a release as shown in fig 16. 

Create release

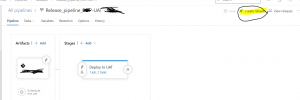
Fig 16: Create a Release from the release pipeline

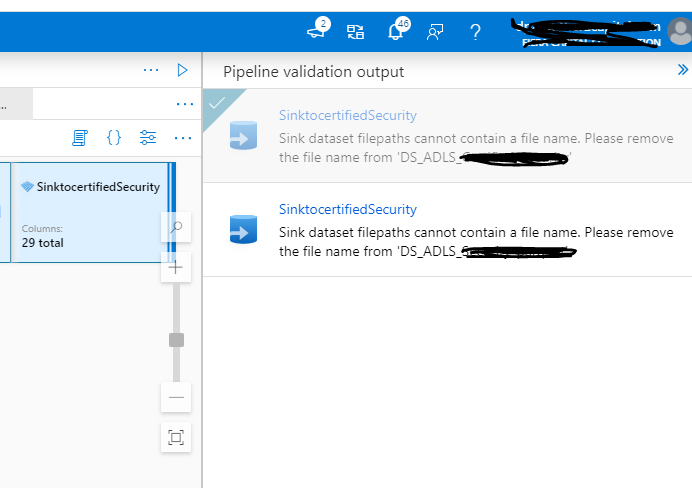
 You are done with CI/CD. Now to test it please go to your ADF instance choose the master branch and then click the 'Publish' button as shown below in figure 17. The C/CD process starts and the codes for pipelines, Linked Services, and Datasets move from the Development environment to Pre-Prod and then to Production.

publish from ADF

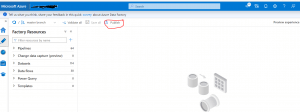
Fig 17: Publish from Azure Data Factory (ADF)

The blog post demonstrates step by step process of implementing CI/CD for ADF by using ARM templates. However, in addition to ARM template deployment; there is another ARM template named "Azure Data Factory Deployment (ARM)" which can also be used to implement CI/CD for ADF.


Saturday, September 25, 2021

How to recover if Azure Data Factory AutoResolveIntegrationRuntime become corrupted?

I would like to share my recent experience with Azure Data Factory (ADF) where AutoResolveIntegrationRuntime become corrupted and how to fix it. I still don't know how the Integration Runtime (IR) is corrupted and don't expect this may happen to you but if it happens then this article will help you to solve the issue.

Problem statement:

In general, the ADF AutoResolveIntegrationRuntime should look like below fig 1.


Fig 1: AutoResolveIntegrationRuntime in Azure


As shown in figure 2, I found in ADF AutoResolve IR has been changes from ‘Public’ to ‘Managed Virtual Network” and Status of the IR said "Failed to get status" under the master branch.


Fig 2: Corrupted AutoResolveIntegrationRuntime

I was shocked, was not aware of any code changes that may impact AutoResolve IR. Due to AutoResolve IR corruption release pipeline stopped working, hence we were not able to push new changes to PROD.

Identify the Issue:

After looking into the DevOps code repo, as found below fig 3 is shown extra code has been added to the original code.

Fig 3:  Managed virtual network section has been added


Resolution:

Delete the below code as shown above fig 3 from the DevOps. This part of code changed the AutoResolve IR's Sub-type from 'Public' to 'Managed Virtual Network'.

"managedVirtualNetwork": {
            "type""ManagedVirtualNetworkReference",
            "referenceName""default"
        }


After deleting the part of the code from master branch, the issue seems resolved but not completely. As shown below fig 4, the IR changes back from 'Managed Virtual Network' to 'Public', however; still the status is showing error message.

Fig 4: Status still showing error 

At this stage, release pipeline started working means I was able push the changes to  PROD. However; I wanted to see error message disappear. To clean the error message I had to delete the AutoResolve IR code as shown below fig 5. To do so, logged into the Azure DevOps and have chosen the master branch and then under integrationRuntime folder there were two files one is AutoResolve IR and other one is selfhosted IR, I have deleted AutoResolve IR file.

Fig 5: Remove AutoResolveIntegrationRuntime from DevOps

After the file is deleted, checked ADF portal and then refresh it found the error is completely gone. So anytime you find AutoResolve IR is corrupted from your master branch you know how to fix it.


Tuesday, February 23, 2021

How to add local timestamp end of the files in ADF?

This article will describe how to add your local timestamp at the end of the each file in Azure Data Factory (ADF). In general, ADF gets a UTC timestamp, so we need to convert the timestamp from UTC to EST, since our local time zone is EST.

For example, if the input Source file name in SFTP is "_source_Customer.csv", then the expected outcome will be, "_source_Customer_2021-02-12T133751.csv". This means that the pipeline should add '_2021-02-12T133751' to the end of each file. This will work dynamically, which means that any file you pass from the source will have the timestamp added to it by using an ADF regular expression.

Let's set a simple pipeline and explain the scenario in a few steps. In this example, we receive files from an event based trigger and hold the file name in a parameter. The main part of this article is how to append the current date and time to the end of the file name we received. Please note that event based triggers will not be discussed here. If you like to know more about how to create trigger, please follow this link.

Step 1: Add Copy Activity

Create a simple pipeline with at least one Copy activity that connects a source and a sink, similar to what is shown in Fig 1.


                                          Fig 1: Pipeline with Copy Activity
 

Step 2: Adding a parameter to receive the file name 

Before adding the expression, we need to have a parameter in the pipeline that will catch the filename from a trigger. For the time being assume that the trigger will give us the file name and the parameter is to hold the filename.
 
                                                 
                                                              Fig 2: Adding parameter

Step 3: Prepare the sink dataset

In the Copy data activity there is a Sink dataset that needs a parameter. Click on the Sink dataset and when it opens, you will find the view similar to Fig 3.

                                                                         
                                                                                Fig 3: Adding parameter to the dataset
 
To add parameter to the dataset, click New and add the parameter name. Select the type, which should be a string. Now you you will see the sink dataset looks like Fig 4. The value edit box is where you need to add the dynamic content.
                                             
                                                  Fig 4: Dynamic content to add the timestamp


Step 4: Setting up a dynamic expression

Now, let's create the dynamic expression. As soon you hit the 'Add dynamic content', shown in Figure 5, you will able to write the expression that will convert the UTC timestamp to EST and then pad end of the file.

                                         
                                                                  Fig 5: expression language
 
We apply a number of functions to the pTriggerFile parameter from Step 1. Let's have closer look at the expression:
@concat(replace(pipeline().parameters.pTriggerFile,'.csv',''), '_', 
formatDateTime(convertTimeZone(utcnow(),'UTC','Eastern Standard Time'),'yyyy-MM-ddTHHmmss'), '.csv')

Find out the explanation of the above expression.

  1. First we need to get the filename from the parameter, pTriggerFile. The value here will be: _source_Customer.csv
  2. Next we use REPLACE() to replace the .csv with empty string : replace(pipeline().parameters.pTriggerFile,'.csv',''). This case, we get:  _source_Customer
  3. We need to get the timestamp. To do that, we convert utcnow() to EST with this function: convertTimeZone(utcnow(),'UTC','Eastern Standard Time')
  4. We want to format the date, and use this: formatDateTime(convertTimeZone(utcnow(),'UTC','Eastern Standard Time'),'yyyy-MM-ddTHHmmss'), which will return a value like: 2021-02-12T133751
  5. We put this all together with @concat(Step1,'_', 'Step4','.csv'), which will return _source_Customer_2021-02-12T133751.csv

We learned how to add local timestamp end of any file, though in this case, the source file was a .csv. However, you can follow the same process for .txt file where you only need to change '.csv' to '.txt' in the expression.

Wednesday, December 30, 2020

ADF data flow: can particular date format generate NULL value?

I am going to share recent finding in ADF data flow where my source data in .csv got correct date. However, as long as when I did some transformation and saved in .parquet found those date all got empty values. This blog post will describe the issue and the resolution.


Source data in .csv have startDate and CloseDate like below figure 1.0 where format of the date is MM/dd/yyyy

Fig 1.0: Date in the source .csv


I have used ADF data flow to cleanup/transform the files and saved into .parquet format. However, in the .parquet file these two date columns 'StartDate' and 'CloseDate' become empty.


Fig 1.1: Dates become empty in .parquet


After looking into the dataflow and specific looking at the projection of the source found auto detect date format ‘MM/dd/YYYY’ which is original source date format.


Fig 1.3: Date format auto detected in the data flow

 And when previewed the data those date shown as NULL which was kind of weird.


Fig 1.4: Date shown as NULL in the data preview

How to solve it? 

To fix this issue, what you need to do is, go under projection and change the date format to ‘yyyy-MM-dd’ as like below figure 2.0


Fig 2.0: Change date format


 And you can go and see the preview, it looks good now.


Fig 2.1: After changing the date format preview looks perfect


 Note that, I have tried with other format from projection such as yyyy/MM/dd and so on but those did not resolve the issue.

Fig 2.2: 


Other Solution?

 You can also take other approach,  change the format from 'date' to 'string'  under the projection

Fig 3.0: change data type from date to string


And then use derive column activity 

Fig 3.1: get 'derived column' in the data flow


Now, use expression to convert into the correct date format : toDate(OpenDate,'yyyy-MM-dd') 

Fig 3.2: expression to convert from string to date


In summary, if you find any discrepancy at output file's date columns then look closely the date format, preview the data in the ADF data flow then either change the format from source projections or use derived column activities to fix it.

Saturday, November 14, 2020

How to deal with NULL in ADF dataflow compared with SSIS?

When you are working with ETL/ELT, sometimes you may need to transform NULL into something meaningful value. If you worked with SSIS, you know how you handle that. This blog post will describe how do we do in SSIS and how the very same task can be done in ADF Dataflow.

 Consider, we have a .csv file where Name columns have NULL value for 2nd record (figure: 1.0)


Fig 1.0: Sample .csv file with NULL record


After connecting the .csv file through flat file source in SSIS data flow, we can debug and view the record through data viewer which will look like below figure 1.1

Fig 1.1: Result in SSIS data flow - data viewer


If you would like to replace the NULL value with meaning value, in that case you need to use derive column activity and use expression.

SSIS data flow expression got REPLACENULL function, which will replace NULL to the expected value that you want.

The expression: REPLACENULL(Name,"Unknown")

The above expression will return 'Unknown' when Name is NULL otherwise it will return the original value.

Fig 1.2: Expression in SSIS Data flow to replace NULL with 'Unknown'


When it comes to ADF data flow regular expression similar like SSIS expression; isNull only give you true or false. And isNull function take only one argument, e.g. below fig 2.1 took the argument Name and return True (✓) if the value is NULL.


Fig 2.0: ADF dataflow isNull function


Now, let's find out how to transform NULL value into something meaningful in ADF data flow. ADF doesn’t have the same function REPLACENULL which used in SSIS, rather there are two ways you can replace the NULL values in ADF dataflow.


Approach 1: Combination of iif and isNULL function


Expression: iif(isNull(Name), 'Unknown', Name)

The function iif will check the condition isNull(Name), if Name have Null value it will return 'Unknown' otherwise original value will be returned.


Fig 2.1:  using iif and isNull in ADF dataflow

Approach 2: By using iifNull function

The smartest solution is to use iifNull which will return exactly the same result we found via approach 1.

expression: iifNull(Name, 'Unknown') will return 'Unknown' if Name have NULL values otherwise it will return original value.

Fig 2.2:iifNULL function to replace NULL value

In summary, expression is similar to replace NULL values for both SSIS and ADF data flow, however, the function you need to use is different for two different tools.

Saturday, September 19, 2020

Azure data Factory: What is not allowed in the file name while using Data Flow (spark engine)?

I was working with a pipeline where data needs to move from source and load into RAW zone in ADLS. As soon as loaded the file it got date time stamp appended end of the file. e.g. source file name is: customer.csv and when it's landed to RAW zone, then file name will be : customer_2020-09-28T12:15:32.csv

How do you add date time stamp end of the file?

Adding dynamic content at the sink pipeline like below (Fig 1) will do the task.


Fig 1: dynamic content to


When I run the pipeline it was appending timestamp end of the file and saving in the blob storage And I was able to view the data from the file: customer_2020-09-28T12:15:32.csv


Fig 2: Preview of the data


In the azure data lake storage file name with ':' did not give any issue while creating the file name as well viewing it. 

However, as soon as I use that file in the Data Flow activity and debug the code (when apache spark engine fire) then below error : java.lang.illegalArgumentException:java.net.URISyntaxException:.... 


Fig 3: java.lang.illegalArgumentException

How to resolve the error?

You can't have file with ':', which also true if you try to create a file in Windows OS with ':' in it. It will throw error, however, interestingly that's not the case when you create a file with same name in Azure data lake storage (HDFS is working behind).

Fig 4: Error in Windows machine

To resolve this, I updated the format of timestamp part while adding end of the each file, instead of using 
yyyy-MM-ddTHH:mm:ss , I have used yyyy-MM-ddTHHmmss. so I get the file name as: customer_2020-09-28T121532.csv

Saturday, August 22, 2020

How to solve Azure data factory Error: Sink dataset filepaths cannot contain a file name ?

I was building a pipeline which was taking data from SFTP folder and sink to Cleansed layer where file format was .parquet. As soon as validated the pipeline got the below error, where the error message is: 'Sink dataset filepath can not contain a file name, please remove the file name from {DatasetName}.

You will find error like this:

Fig 1: Sink dataset error


If you find this error, may get confuse at first since you have file name at two different places. One is at Sink activity settings and other one is at the data set.

Let's guide you to how to find those settings and fix this error. If you look at the Settings for Sink activity, you will find like below fig: 2.


Fig 2: Settings of Sink activity


The error message said filepath can't contain file name but remember this is not data set, it's setting of the Sink activity so you don't need to remove the file name. And if you want to keep it in a single file then choose 'Output to single file'.

So fix the issue you need click Sink and open data set as like below fig 3:

Fig 3: open data set


Now you can find the file name under data set as like below fig 4, Please remove file name, save and validate.

Fig 4: remove file name from Data set

Now the error will disappear. Lesson learned, look at the error message more than once and locate the correct place to fix the issue.