Sunday, March 18, 2018

How to repeat column header in each page of a SSRS Report?

When your SSRS report produce more than one page of output then at the second page and onward you are missing the column headers. So you miss the mapping between data and corresponding column header. You may feel lost, but; how to survive from this situation? Must need to add column header in each page.

To achieve above you need to change some properties of the report. If you go to Tablix properties then you will find options to choose which work fine with matrix but unfortunately doesn't work with table.

Fig 1: Tablix property
Since in my report, I have used Table (fig 2), so when I have used the above properties from Tablix it did not work.

Fig 2: SSRS toolbox 'Table'
To make it work, I had to choose advance properties which are followings:

1) Make advance property available 

Select heading section and then select the arrow at the right corner to get advance option available (fig 3)
Fig 3: Finding advance property 
2) Update the advance property value 

After you click the 'advanced mode' described in step 1, you will find below:

Fig 4: Looking into Advance mode


Make sure you have selected 'static' (yellow shaded from fig 4) and then find the properties of it by clicking property window from View->Properties window which will look like figure 5.
Please change the value KeepWithGroup='After' and RepeatOnNewPage='True'.


Fig 5: update the property value


Wednesday, February 14, 2018

How to load data into Data Warehouse from a RESTful API

While you are working with data warehouse/ BI development, sometimes you may need to load data from API. The API can be RESTful or SOAP web service. However, this post cover how to load data from RESTful API which return a .JSON file and then insert the data from the .JSON file into a table in Data Warehouse.

Tool uses: Visual Studio 2017 Windows Application (C#), SSIS, MS SQL Server 2016 +

Steps includes:
1) Load data from Web API (REST) and save as .json file by using  Visual Studio 2017 Windows Application (C#)
2) Insert data from the .json file to a table in data warehouse by using MS SSIS


Details of the steps are followings:


Step 1: Load data from Web API (REST) and save as .json file by using  Visual Studio 2017 Windows Application (C#)

a) Create a visual studio solution by selecting Windows Form Apps under Windows Classic Desktop as like below figure 1.
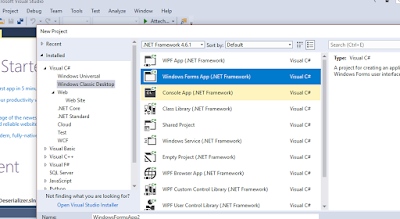
Fig 1: Create VS solution to load data from Web API
b)  Code Behind to call web service and generate the .JSON file

Please copy the code and paste into your newly created project at the right place and change the URL for the API as suggested.

private void Form1_Load(object sender, EventArgs e)
        {
            try
            {
                var jsonData = readData();
             
            }
            catch (Exception ex)
            {
                throw ex;
            }
        }
        private string readData()
        {
            try
            {
                string fileName = string.Format("{0}\\{1}", System.IO.Path.GetDirectoryName(Application.ExecutablePath), @"APIFile.json");
                if (!writeByteInFile(fileName, downloadData()))
                {
                    return string.Empty;
                }

                if (System.IO.File.Exists(fileName))
                {
                    string text = System.IO.File.ReadAllText(fileName);
                    return text;
                }
                return string.Empty;
            }
            catch (Exception ex)
            {
                return string.Empty;
            }
        }


        private byte[] downloadData()
        {
            WebClient request = new WebClient();
            byte[] downloadData = request.DownloadData(@"https://ABCRestfulWebAPI" /*replace with your vendor provided web API*/
            return downloadData;
        }

        private bool writeByteInFile(string fileName, byte[] byteArray)
        {
            try
            {
                if (System.IO.File.Exists(fileName))
                {
                    System.IO.File.Delete(fileName);
                }

                using (var fs = new FileStream(fileName, FileMode.Create, FileAccess.Write))
                {
                    fs.Write(byteArray, 0, byteArray.Length);
                    return true;
                }
            }
            catch (Exception ex)
            {
                return false;
            }

        }

You will find the .json file loaded to the bin folder of the solution:
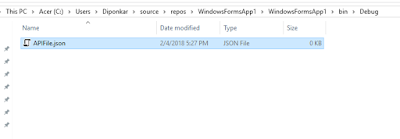
Fig 2: Loaded .JSON file from the Web API


Step 2: Insert data from the .json file to a table in the data warehouse by using MS SSIS

a)  JSON data format :  The JSON file that we downloaded by following step 1 is look like below fig:3
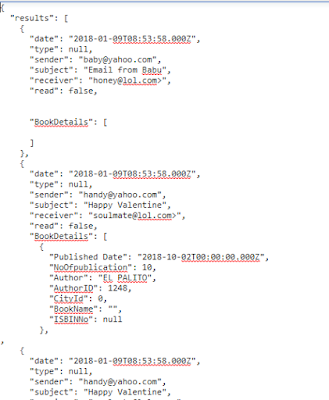
Fig 3: Read Json File

b) Parse and Transform the JSON Data

We are fortunate enough that, from MS SQL Server 2016 and on ward Microsoft has JSON capabilities where you can parse and transform the JSON data to SQL table format.

Write the below query to parse the JSON data and transform as like SQL table data.

SELECT [date]
      ,[type]
  ,sender
  ,[subject]
  ,receiver
  ,[read]


FROM OPENROWSET (BULK 'C:\temp\APIFile.json', SINGLE_CLOB) as j
CROSS APPLY OPENJSON(BulkColumn, '$.results')
WITH ([date] date
      ,[type] nvarchar(20)
  ,sender nvarchar(100)
  ,subject nvarchar(200)
  ,receiver nvarchar(400)
  ,[read]  bit

)

After running the above syntax you will find data like below:

Fig 4: After parsing JSON data it's exactly look like SQL table now


c) Make a SSIS package to run End to End

At last, create a SSIS package and include following steps to load the data into the table

i ) Process task is running to execute the .exe file created via step 1
ii) Moving json file to other location (It's best to keep the imported file at one place, but it's not mandatory)
iii) Data flow task to read data from json file, parse and transform it and  then load to the destination table (OLEDB source and OLEDB destination have been used to load the data to the table)
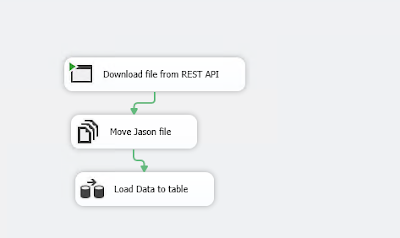
Fig 5. How SSIS package will load data to the table

Thursday, January 18, 2018

How to deploy SSIS package to Sql Server Integration Services Catalogs (SSISDB)?

Though there are different methods to deploy SSIS package, however; this blog post will cover how to deploy SSIS package to SSISDB. So far found, deploying to SSISDB is considered as best practice. SSISDB is introduced with SQL server 2012. The advantages you can have by using SSISDB as follows:
1) Easy to deploy from one environment to other
2) Report facilities in the SSISDB, so you can see execution time, error or whatever happend to your packages.
3) SSISDB is protected so your connection string and sensitive data is safe.

As per MSDN, "The SSISDB catalog is the central point for working with Integration Services (SSIS) projects that you’ve deployed to the Integration Services server. For example, you set project and package parameters, configure environments to specify runtime values for packages, execute and troubleshoot packages, and manage Integration Services server operations.The objects that are stored in the SSISDB catalog include projects, packages, parameters, environments, and operational history."

Let's divide the topic into two section 1) Creating Catalog 2) Deploy package to the catalog

Section 1: Creating catalog

step 1: Log into you Sql Server management studio and you will find the folder "Integration Services Catalogs", please create catalog as like below  fig 1:

fig 1: Create Catalog

Step 2: Create folder under Catalog:
Right click the newly created catalog 'SSISDB' and then create new folder with the different layers (e.g. staging, edw layer, data mart layer etc.)

fig 2: Folder under catalogue
After you create folder you will find  two new folders automatically created under the folder. It means if you create a folder called 'DSA' then you will find two folders  'Projects' and 'Environments' as like below Fig 2A
Fig 2A: folder under SSISDB


Section 2: Deploy package to the catalog

The below steps will assist you to deploy the package to the catalog.

Step 1: Build the solution and I am sure you all know how to build solution ;)

fig 3: build the solution
Step 2: Locate the .ispac file

fig 4: .ispac file

Step 3: Follow the wizard to deploy

Double click the .ispac file and then you will find below wizard:

fig 5: 1st page of the wizard

Choose the option project deployment and browse the .ispac file that you want to deploy.
fig 6: project deployment
Now you reach at the destination wizard where please  provide the destination server name (SQL server name where you will deploy the package) and then browse the path. When you click the browse for path you will find folder list from SSSIDB catalog (the folder you created at the section 1, step 2 of this post)

fig 7: choose destination path


So your package deployment is done to the SSISDB catalog.

SSISDB catalog has the opportunity to monitor the packages, you can create report from it. please find the below figure to generate the report:

fig 8: SSISDB catalog report


Saturday, December 16, 2017

How to create new workspace in TFS?

You may need to create new workspace in TFS, if your current workspace is corrupted or you have some issues with where you messed up totally. I am going to guide you how to create a new workspace and load the source code in the new workspace so you can have fresh start over.

Finding out the menu item 'workspaces' could be tricky, so you go :

File->source Control->Advanced->Workspaces  as like below image.


Fig 1 : Find out Workspace for TFS

When you are at the work space window then please fill up all necessary information to add new  work space:

By following above fig 2:  You need to fill up as below:


a)       Click ‘Add’
b)      Edit name
c)       Put status as ‘Active’
d)      Put Source control folder to /FolderBI
e)      Put the local folder location where you would like to put the source ode


Fig 2: fill up info for new work space

Now you are good to go and get the latest to the new folder you specified.


Saturday, November 25, 2017

How to handle trailing space while you use LEN function in SQL


LEN function in MS SQL returns the number of characters of the specified string expression, excluding trailing blanks. [1]

It means if your data has trailing blank /space in the string then LEN function will ignore that.
e.g. 

SELECT LEN('DK123456789 ') as LengthofString

Which give you as length 11, though with space it’s 12.
Well, you can say we know it will be 11 why you should have 12? Or what is problem if it returns length as 11?

Let’s discuss the above scenario, consider above string 'DK123456789’ is a valid company VAT registration number. And your customer asked to get only the number part, so output should be ‘123456789’
So you use RIGHT function as like below:
Fig 1: RIGHT function to find number part


And you get the right result.

However, if your data has issue like trailing blank then can you expect the result`? Let’s see:

Fig 2: When you have data issue


So you lost the first digit since RIGHT function consider space/blank as character so you get 9 character from the right side of the value which include one space but discard first character ‘1’.

The above particular example we already know the length, however; when we query SQL table then we don’t know the length so we must calculate length as well.
so let’s create a table and insert some data:

CREATE Table #Table1 (
 [VATRegistration] nvarchar(50))

 insert into #Table1 values('DK123456789 ')
 insert into #Table1 values('DE7891012879')
 insert into #Table1 values('BD989741258')

 select * from #Table1


Fig 3: VAT registration data


We make the SQL query to find out only number part from the above dataset, the query is look like:


SELECT [VATRegistration],RIGHT([VATRegistration],LEN([VATRegistration])-2)  as [VATRegistrationNo]
FROM #Table1   /*Since we know first two characters need to exclude from the VAT number*/

 
Fig 4: Output with error data


Does our result correct? Look closer and will find first row has discarded first digit. Why this happened? Because the data has issue, If you look at the above insert statement you will find it has trailing space. So how do we solve this?

The main problem here is to calculate the LEN, since data LEN will not count space as length. Well can’t we try RTRIM then? Sure let’s do it.


 SELECT [VATRegistration],RIGHT([VATRegistration],LEN(RTRIM([VATRegistration]))-2)  as [VATRegistrationNo]
 FROM #Table1   /*Since we know first two characters need to exclude from the VAT number*/


Unfortunately, result did not change, well; it’s not unfortunate; rather this how it’s built, TRIM function will not have any effect under LEN function.

What can we do then? Yes…, REPLACE must be a good option here.


SELECT [VATRegistration],RIGHT([VATRegistration],LEN(REPLACE([VATRegistration],' ','_'))-2)  as [VATRegistrationNo]
 FROM #Table1   /*Since we know first two characters need to exclude from the VAT number*/


Result look fine now:

 
Fig 5: Correct output by using REPLACE

Since REPLACE make removed the space and put ‘_’ which is count as character. And RIGHT function return 10 character from right to the left which include space as well.


Fig 6: Where is the difference??

 After you get the result you can RTRIM the final value before you present to the report or sending to the business.


Thursday, October 19, 2017

Step by step guideline for installing Visual studio 2017 for BI Developer


It is easy to install Visual studio in general, you make a few clicks, follow the wizard and then you are done. However, when it comes to Microsoft BI tool installation then last couple of years it changes a few times. For example earlier (before VS 2010), the BI tool called  Business Intelligence Development Studio (BIDS) and it was part of SQL Server installation.

But when Visual Studio 2010 release, you got new name called 'SQL server data tools (SSDT)' and which you had to install top of Visual studio..
 Fig 1: SQL Server Data Tools menu

When you open SQL Server Data Tools (SSDT) you find the template like below to develop BI solutions.

Fig 2: Templates under SSDT


However, Visual Studio 2017 release you will not have fully functional SQL Server Data Tools as separate instance. The template for making BI solution (SSIS,SSAS, SSRS) will be integrated inside Visual Studio 2017. Being said so, the release version 15.3.0 preview also have possibility to install as separate instance. However, stand alone instance breaks every time if you try to connect with TFS.

Enough talking. let's start with the Visual Studio 2017 installation steps for BI Developer:

Step 1: First install the Visual Studio 2017

Run the VS 2017 setup package and you will find screen like below to choose for BI development:

Fig 3: choose what to pick

Below image will give you closer look of what have been chosen for BI development.

Fig 4: Closer look -what have been chosen for BI
After you select the boxes you follow the wizard and will be completed the VS 2017 installation.


Step 2: After completing the VS 2017 installation take the SSDT file downloaded from (https://docs.microsoft.com/en-us/sql/ssdt/download-sql-server-data-tools-ssdt). If you already have the SSDT exc file then please avoid dowloading the file.

When you run the SSDT-Setup-ENU.exe file , you will find below window to choose from :

Fig 5: Option to choose for installing separate instance for BI

If you want templates for BI development should be place inside Visual studio 2017 then use the first option; but if you want separate instance then choose the second option from drop down list which is: "Install new SQL Server Data Tools for Visual Studio 2017 instance"

I have installed separate instance at first go and installation went fine, under your desktop menu you will find Visual Studio 2017 (2) as like below:

Fig 6: Separate instance only with BI Templates

Though separate instance installation went fine, however; the instance was crashing every time I have tried to connect TFS. Then I uninstalled it and installed with the option selected " Visual Studio Community 2017" (Look at the figure 5). And I get BI templates inside the Visual Studio 2017 which look like below:


Fig 7: BI templates inside VS 2017
Now you are ready to make your BI solutions by using brand new Visual studio 2017 and it also works integrating with TFS.


Saturday, September 30, 2017

Return NULL value from empty table

You may come at the situation where you need to return NULL even if your table is completely empty. For example, you need to make an action depend on if the table's column has value or not., it's generally the case, when you would like to load the data in your data warehouse for the first time and then extract delta every day.

Fig 1: Make action depend on the tab'e's data

From the above case, we need to check if a column of the table has value or not. We have created a table which is empty.

Fig 2: Empty Data set

Now if you would like to produce a value when there is no data in a table, you can return NULL.

There maybe many ways to find out , but my preferable way will be

Approach 1:

select case when count(1)=0 then NULL else 1 end from dbo.[TimeStamp]

In case you need to pass parameter then:

select case when count(1)=0 then NULL else 1 end from dbo.[TimeStamp] where TableName='Table1'

Approach 2:

select
  (select [MaxTimeStamp] from dbo.[TimeStamp] ) as [MaxTimeStamp]

In case you need to pass parameter then:

  select
  (select [MaxTimeStamp] from dbo.[TimeStamp] where tablename='table1') as [MaxTimeStamp]


You can use any one of the syntax to return NULL whenever you need it.